Category Archives: Uncategorized

Objective-c tutorial – adding coredata to save posts and comments

Hint (before starting the coredata part of this tutorial): This tutorial is based on the first two parts, see the first part here and the second part here. You should have them done before starting with this part.

Now we are going to add coredata to the project. This way posts and comments will be saved in the coredata database. Additionally, we will add a button to delete the contents of the database and another button to sync the data between the blog and coredata.

Adding coredata to the project

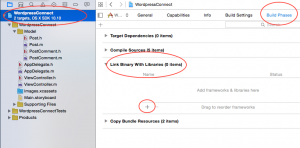
Usually there is an option to use coredata while adding a project in Xcode. Since we already have a project, we need to add coredata the following way: Select your project from the files, click the tab “Build Phases” and open “Link Binary With Libraries”. There is a button representing a “+” which you should click:

Adding coredata to the project

Adding coredata to the project

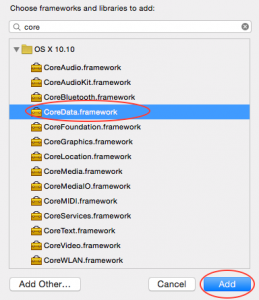
After this a dialog opens, search for coredata, select CoreData.framework and click “Add”:

Adding coredata to the project - step 2

Adding coredata to the project – step 2

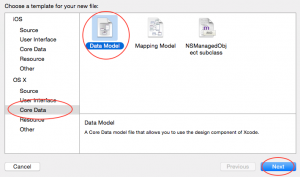
Now you should add the model file of coredata to the project. Click “File” -> “New” -> “File”, select the register “Core Data” and choose the first option called “Data Model”:

Add the coredata data model

Add the coredata data model

Click “Next” and choose a name (I chose “wpconnect.xcdatamodeld”).

Defining the coredata data model

Open the data model you just added to the project. In the bottom right corner you will see two options: “Editor” and “Style”. Open the “Editor” to mode. Use the button “Add Entity” to add two entities, call the first one “Post” and the second one “PostComment”. For the entity “Post”, add an attribute “postId” with the type “Integer 16” and another attribute “title” with the type “String”. Add a relationship called “comments” with the destination “PostComment”. After clicking the relationship “comments”, you will see an relationship inspector on the right side. Set type to “To Many” (because a post has 0..* comments).

For the entity “PostComment”, add an attribute “comId” with the type “Integer 16” and another attribute “text” with the type “String”. Add a relationship “post” and set the destination to “Post”. The type needs to stay “To One”, because a comment always belongs to a post.

New model classes from coredata

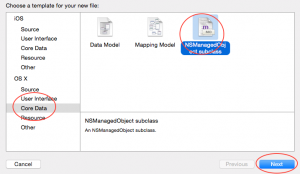
During the previous two steps of the tutorial we already created two model classes: Post and PostComment. Delete these four files (both header and implementation). We will generate these classes via the coredata framework. Click on “File” -> “New” -> “File” and choose “NSManagedObject subclass” from the Core Data register:

Add the model classes via coredata

Add the model classes via coredata

In the consecutive views, select the data model (wpconnect in our case) and the two classes “Post” and “PostComment”. After generating, the classes should look like this:

Post.h

#import <Foundation/Foundation.h>
#import <CoreData/CoreData.h>

@class PostComment;

@interface Post : NSManagedObject

@property (nonatomic, retain) NSNumber * postId;
@property (nonatomic, retain) NSString * title;
@property (nonatomic, retain) NSSet *comments;
@end

@interface Post (CoreDataGeneratedAccessors)

- (void)addCommentsObject:(PostComment *)value;
- (void)removeCommentsObject:(PostComment *)value;
- (void)addComments:(NSSet *)values;
- (void)removeComments:(NSSet *)values;

@end

Post.m

#import "Post.h"
#import "PostComment.h"

@implementation Post

@dynamic postId;
@dynamic title;
@dynamic comments;

@end

PostComment.h

#import <Foundation/Foundation.h>
#import <CoreData/CoreData.h>

@class Post;

@interface PostComment : NSManagedObject

@property (nonatomic, retain) NSNumber * comId;
@property (nonatomic, retain) NSString * text;
@property (nonatomic, retain) Post *post;

@end

PostComment.m

#import "PostComment.h"
#import "Post.h"

@implementation PostComment

@dynamic comId;
@dynamic text;
@dynamic post;

@end

Further implementation for coredata: Since we added coredata to an existing project, we need to adjust also both AppDelegate files. In the header file (AppDelegate.h) add the following properties:

@property (readonly, strong, nonatomic) NSManagedObjectContext *managedObjectContext;
@property (readonly, strong, nonatomic) NSManagedObjectModel *managedObjectModel;
@property (readonly, strong, nonatomic) NSPersistentStoreCoordinator *persistentStoreCoordinator;

In the implementation file (AppDelegate.m) add the following lines before “@end”:

#pragma mark - Core Data stack

@synthesize persistentStoreCoordinator = _persistentStoreCoordinator;
@synthesize managedObjectModel = _managedObjectModel;
@synthesize managedObjectContext = _managedObjectContext;

- (NSURL *)applicationDocumentsDirectory {
    // The directory the application uses to store the Core Data store file. This code uses a directory named "me.meberhard.AnotherText" in the user's Application Support directory.
    NSURL *appSupportURL = [[[NSFileManager defaultManager] URLsForDirectory:NSApplicationSupportDirectory inDomains:NSUserDomainMask] lastObject];
    return [appSupportURL URLByAppendingPathComponent:@"me.meberhard.WordpressConnect"];
}

- (NSManagedObjectModel *)managedObjectModel {
    // The managed object model for the application. It is a fatal error for the application not to be able to find and load its model.
    if (_managedObjectModel) {
        return _managedObjectModel;
    }

    NSURL *modelURL = [[NSBundle mainBundle] URLForResource:@"wpconnect" withExtension:@"momd"];
    _managedObjectModel = [[NSManagedObjectModel alloc] initWithContentsOfURL:modelURL];
    return _managedObjectModel;
}

- (NSPersistentStoreCoordinator *)persistentStoreCoordinator {
    // The persistent store coordinator for the application. This implementation creates and return a coordinator, having added the store for the application to it. (The directory for the store is created, if necessary.)
    if (_persistentStoreCoordinator) {
        return _persistentStoreCoordinator;
    }

    NSFileManager *fileManager = [NSFileManager defaultManager];
    NSURL *applicationDocumentsDirectory = [self applicationDocumentsDirectory];
    BOOL shouldFail = NO;
    NSError *error = nil;
    NSString *failureReason = @"There was an error creating or loading the application's saved data.";

    // Make sure the application files directory is there
    NSDictionary *properties = [applicationDocumentsDirectory resourceValuesForKeys:@[NSURLIsDirectoryKey] error:&error];
    if (properties) {
        if (![properties[NSURLIsDirectoryKey] boolValue]) {
            failureReason = [NSString stringWithFormat:@"Expected a folder to store application data, found a file (%@).", [applicationDocumentsDirectory path]];
            shouldFail = YES;
        }
    } else if ([error code] == NSFileReadNoSuchFileError) {
        error = nil;
        [fileManager createDirectoryAtPath:[applicationDocumentsDirectory path] withIntermediateDirectories:YES attributes:nil error:&error];
    }

    if (!shouldFail && !error) {
        NSPersistentStoreCoordinator *coordinator = [[NSPersistentStoreCoordinator alloc] initWithManagedObjectModel:[self managedObjectModel]];
        NSURL *url = [applicationDocumentsDirectory URLByAppendingPathComponent:@"OSXCoreDataObjC.storedata"];
        if (![coordinator addPersistentStoreWithType:NSXMLStoreType configuration:nil URL:url options:nil error:&error]) {
            coordinator = nil;
        }
        _persistentStoreCoordinator = coordinator;
    }

    if (shouldFail || error) {
        // Report any error we got.
        NSMutableDictionary *dict = [NSMutableDictionary dictionary];
        dict[NSLocalizedDescriptionKey] = @"Failed to initialize the application's saved data";
        dict[NSLocalizedFailureReasonErrorKey] = failureReason;
        if (error) {
            dict[NSUnderlyingErrorKey] = error;
        }
        error = [NSError errorWithDomain:@"YOUR_ERROR_DOMAIN" code:9999 userInfo:dict];
        [[NSApplication sharedApplication] presentError:error];
    }
    return _persistentStoreCoordinator;
}

- (NSManagedObjectContext *)managedObjectContext {
    // Returns the managed object context for the application (which is already bound to the persistent store coordinator for the application.)
    if (_managedObjectContext) {
        return _managedObjectContext;
    }

    NSPersistentStoreCoordinator *coordinator = [self persistentStoreCoordinator];
    if (!coordinator) {
        return nil;
    }
    _managedObjectContext = [[NSManagedObjectContext alloc] init];
    [_managedObjectContext setPersistentStoreCoordinator:coordinator];

    return _managedObjectContext;
}

#pragma mark - Core Data Saving and Undo support

- (IBAction)saveAction:(id)sender {
    // Performs the save action for the application, which is to send the save: message to the application's managed object context. Any encountered errors are presented to the user.
    if (![[self managedObjectContext] commitEditing]) {
        NSLog(@"%@:%@ unable to commit editing before saving", [self class], NSStringFromSelector(_cmd));
    }

    NSError *error = nil;
    if ([[self managedObjectContext] hasChanges] && ![[self managedObjectContext] save:&error]) {
        [[NSApplication sharedApplication] presentError:error];
    }
}

- (NSUndoManager *)windowWillReturnUndoManager:(NSWindow *)window {
    // Returns the NSUndoManager for the application. In this case, the manager returned is that of the managed object context for the application.
    return [[self managedObjectContext] undoManager];
}

- (NSApplicationTerminateReply)applicationShouldTerminate:(NSApplication *)sender {
    // Save changes in the application's managed object context before the application terminates.

    if (!_managedObjectContext) {
        return NSTerminateNow;
    }

    if (![[self managedObjectContext] commitEditing]) {
        NSLog(@"%@:%@ unable to commit editing to terminate", [self class], NSStringFromSelector(_cmd));
        return NSTerminateCancel;
    }

    if (![[self managedObjectContext] hasChanges]) {
        return NSTerminateNow;
    }

    NSError *error = nil;
    if (![[self managedObjectContext] save:&error]) {

        // Customize this code block to include application-specific recovery steps.
        BOOL result = [sender presentError:error];
        if (result) {
            return NSTerminateCancel;
        }

        NSString *question = NSLocalizedString(@"Could not save changes while quitting. Quit anyway?", @"Quit without saves error question message");
        NSString *info = NSLocalizedString(@"Quitting now will lose any changes you have made since the last successful save", @"Quit without saves error question info");
        NSString *quitButton = NSLocalizedString(@"Quit anyway", @"Quit anyway button title");
        NSString *cancelButton = NSLocalizedString(@"Cancel", @"Cancel button title");
        NSAlert *alert = [[NSAlert alloc] init];
        [alert setMessageText:question];
        [alert setInformativeText:info];
        [alert addButtonWithTitle:quitButton];
        [alert addButtonWithTitle:cancelButton];

        NSInteger answer = [alert runModal];

        if (answer == NSAlertFirstButtonReturn) {
            return NSTerminateCancel;
        }
    }

    return NSTerminateNow;
}

These lines are usually auto-generated when you add an application with coredata.

Further implementation – post coredata

After taking care of adding the coredata framework, the data model, the model classes and adjusting AppDelegate, we can now adjust the implementation. We assume the following workflow:

  1. The application has two tables, one displays the posts and the other displays comments on posts.
  2. We have two buttons: One for syncing the coredata database with the blog, and another one to wipe the coredata database.
  3. When the application start, show all posts which are currently available in the coredata database.
  4. When the user clicks syncs, download new posts and comments from the blog (we will not add logic for updating changed posts or for deleting not available posts – in order to keep it simple).
  5. When the user deletes the contents of the coredata database, the table views will be empty, because there are no posts and comments available anymore.

The logic in AppDelegate.m:

#import "AppDelegate.h"
#import "Post.h"
#import "PostComment.h"

@interface AppDelegate ()

@end

@implementation AppDelegate

- (void)applicationDidFinishLaunching:(NSNotification *)aNotification {
    // Insert code here to initialize your application

    [[NSNotificationCenter defaultCenter] addObserver:self selector:@selector(flushData) name:@"flushData" object:nil];

    [[NSNotificationCenter defaultCenter] addObserver:self selector:@selector(syncData) name:@"syncData" object:nil];

    [[NSNotificationCenter defaultCenter] addObserver:self selector:@selector(getCommentsForPostId:) name:@"getComments" object:nil];

    [self showPostsInView];
    }

- (void)applicationWillTerminate:(NSNotification *)aNotification {
    // Insert code here to tear down your application
}

- (void)syncData {
    [self receivePostsFromBlog];
}

- (void)receivePostsFromBlog {
    NSURL *url = [NSURL URLWithString:@"http://meberhard.me/wp-json/posts"];
    NSURLRequest *request = [NSURLRequest requestWithURL:url];
    [NSURLConnection sendAsynchronousRequest:request queue:[NSOperationQueue mainQueue] completionHandler:^(NSURLResponse *repsone, NSData *data, NSError *connectionError) {
        if (data.length > 0 && connectionError == nil) {
            NSDictionary *wpPosts = [NSJSONSerialization JSONObjectWithData:data options:0 error:NULL];
            for (id key in wpPosts) {
                NSNumber *postId = [NSNumber numberWithInt:((int)[[key objectForKey:@"ID"] integerValue])];
                if (![self checkIfPostIdExists:postId]) {
                    NSString *postTitle = [key objectForKey:@"title"];
                    NSManagedObjectContext *context = [self managedObjectContext];
                    Post *post = [NSEntityDescription insertNewObjectForEntityForName:@"Post" inManagedObjectContext:context];
                    post.postId = postId;
                    post.title = postTitle;
                    NSError *error;
                    if (![context save:&error]) {
                        NSLog(@"Something went wrong: %@", [error localizedDescription]);
                    } else {
                        [self receiveCommentsFromBlogForPost:post];
                    }
                } else {
                    NSFetchRequest *fetchRequest = [[NSFetchRequest alloc] init];
                    NSEntityDescription *entity = [NSEntityDescription entityForName:@"Post" inManagedObjectContext:[self managedObjectContext]];
                    [fetchRequest setEntity:entity];
                    NSPredicate *predicate = [NSPredicate predicateWithFormat:@"postId == %@", postId];
                    [fetchRequest setPredicate:predicate];
                    NSError *error;
                    NSArray *items = [self.managedObjectContext executeFetchRequest:fetchRequest error:&error];
                    Post *post = [items objectAtIndex:0];
                    [self receiveCommentsFromBlogForPost:post];
                    NSLog(@"Post with id %@ exists in DB, skipping", postId);
                }
            }
        }
        [self showPostsInView];
    }];
}

- (void)receiveCommentsFromBlogForPost:(Post *)post {
    NSString *restUrl = [NSString stringWithFormat:@"http://meberhard.me/wp-json/posts/%ld/comments", [post.postId integerValue]];
    NSURL *url = [NSURL URLWithString:restUrl];
    NSURLRequest *request = [NSURLRequest requestWithURL:url];
    [NSURLConnection sendAsynchronousRequest:request queue:[NSOperationQueue mainQueue] completionHandler:^(NSURLResponse *response, NSData *data, NSError *connectionError) {
        if (data.length > 0 && connectionError == nil) {
            NSDictionary *wpComments = [NSJSONSerialization JSONObjectWithData:data options:0 error:NULL];
            for (id key in wpComments) {
                NSNumber *commentId = [NSNumber numberWithInt:((int)[[key objectForKey:@"ID"] integerValue])];
                if (![self checkIfCommentIdExists:commentId]) {
                    NSMutableString *commentText = [[NSMutableString alloc] init];
                    [commentText appendString:[key objectForKey:@"content"]];

                    NSManagedObjectContext *context = [self managedObjectContext];
                    PostComment *pcom = [NSEntityDescription insertNewObjectForEntityForName:@"PostComment" inManagedObjectContext:context];
                    pcom.comId = commentId;
                    pcom.text = commentText;
                    pcom.post = post;
                    [post addCommentsObject:pcom];
                    NSError *error;
                    if (![context save:&error]) {
                        NSLog(@"Something went wrong: %@", [error localizedDescription]);
                    }
                } else {
                    NSLog(@"Comment with comment id %@ exists, skipping", commentId);
                }
            }
        }
    }];
}

- (void)showPostsInView {
    NSLog(@"starting with showPostsInView");
    NSFetchRequest *fetchRequest = [[NSFetchRequest alloc] init];
    NSEntityDescription *entity = [NSEntityDescription entityForName:@"Post" inManagedObjectContext:[self managedObjectContext]];
    [fetchRequest setEntity:entity];
    NSError *error;
    NSArray *fetchedObjects = [[self managedObjectContext] executeFetchRequest:fetchRequest error:&error];
    [[NSNotificationCenter defaultCenter] postNotificationName:@"showPosts" object:fetchedObjects];
}

- (void)flushData {
    NSArray *entities = self.managedObjectModel.entities;
    for (NSEntityDescription *entityDescription in entities) {
        [self deleteAllObjectsWithEntityName:entityDescription.name];
    }
    [[NSNotificationCenter defaultCenter] postNotificationName:@"showPosts" object:nil];
    [[NSNotificationCenter defaultCenter] postNotificationName:@"showComments" object:nil];
}

- (void)deleteAllObjectsWithEntityName:(NSString*)entityName {
    NSFetchRequest *fetchRequest = [NSFetchRequest fetchRequestWithEntityName:entityName];
    fetchRequest.includesPropertyValues = NO;
    fetchRequest.includesSubentities = NO;
    NSError *error;
    NSArray *items = [self.managedObjectContext executeFetchRequest:fetchRequest error:&error];
    for (NSManagedObject *managedObject in items) {
        [self.managedObjectContext deleteObject:managedObject];
    }
}

- (void)getCommentsForPostId:(NSNotification *)notification {
    NSNumber *postId = [notification object];
    NSFetchRequest *fetchRequest = [[NSFetchRequest alloc] init];
    NSEntityDescription *entity = [NSEntityDescription entityForName:@"Post" inManagedObjectContext:[self managedObjectContext]];
    [fetchRequest setEntity:entity];
    NSPredicate *predicate = [NSPredicate predicateWithFormat:@"postId == %@", postId];
    [fetchRequest setPredicate:predicate];
    NSError *error;
    NSArray *items = [self.managedObjectContext executeFetchRequest:fetchRequest error:&error];
    Post *post = [items objectAtIndex:0];
    NSArray *comments = [[post comments] allObjects];
    [[NSNotificationCenter defaultCenter] postNotificationName:@"showComments" object:comments];
}

- (BOOL)checkIfPostIdExists:(NSNumber*)postId {
    NSFetchRequest *fetchRequest = [[NSFetchRequest alloc] init];
    NSEntityDescription *entity = [NSEntityDescription entityForName:@"Post" inManagedObjectContext:[self managedObjectContext]];
    [fetchRequest setEntity:entity];
    NSPredicate *predicate = [NSPredicate predicateWithFormat:@"postId == %@", postId];
    [fetchRequest setPredicate:predicate];
    NSError *error;
    NSArray *items = [self.managedObjectContext executeFetchRequest:fetchRequest error:&error];
    return ([items count] > 0);
}

- (BOOL)checkIfCommentIdExists:(NSNumber*)commentId {
    NSFetchRequest *fetchRequest = [[NSFetchRequest alloc] init];
    NSEntityDescription *entity = [NSEntityDescription entityForName:@"PostComment" inManagedObjectContext:[self managedObjectContext]];
    [fetchRequest setEntity:entity];
    NSPredicate *predicate = [NSPredicate predicateWithFormat:@"comId == %@", commentId];
    [fetchRequest setPredicate:predicate];
    NSError *error;
    NSArray *items = [self.managedObjectContext executeFetchRequest:fetchRequest error:&error];
    return ([items count] > 0);
}

#pragma mark - Core Data stack

.....

In applicationDidFinishLaunching we define three observers: The first one should be triggered, if the user clicks on the flushData button in the view, it calls the method “flushData”. The second one is triggered when the user clicks the “sync” button, it calls the method “syncData”. The last observer gets the comments for a certain post, so the ViewController gets the data for the comment table. The call “showPostsInView” starts the application and displays the available posts per method call.

The method “receivePostsFromBlog” gets the posts from the defined URL. I iterates over the posts in the JSON answer. For every id of a post it checks, if there is already such an id in the coredata database. If such an id exists, it skips adding of the posts and calls the next method (which checks comments for a post) directly. If not, it adds the posts to the coredata database and consecutively calls the method which checks for comments.

“receiveCommentsFromBlogForPost” works the same way as “receivePostsFromBlog”. I receives comments for a certain posts, iterates over the results and adds the comment to the coredata database if it does not already exist.

“showPostsInView” queries the coredata database and receives all posts. After, it posts a notification called “showPosts” containing the posts as an object.

“flushData” and “deleteAllObjectsWithEntityName” are both used to flush the coredata database. One call to “flushData” is sufficient. “getCommentsForPostId” queries the coredata database for comments, which are assigned to a post. After, it posts a notification called “showComments”, containing the comments as an object.

“checkIfPostIdExists” and “checkIfCommentIdExists” are both helper methods for the first two methods. They check, if a post/comment with a certain ID exists in the coredata database and return NO/YES accordingly.

Changing the storyboard and the ViewController

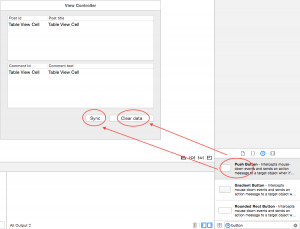
Using the storyboard, we will add two buttons under the table views. Add two “Push Buttons” and drag them onto the storyboard:

Add buttons to the view (coredata part)

Add buttons to the view

In ViewController.h, add the following two properties:

@property (nonatomic, strong) IBOutlet NSButton *deleteData;
@property (nonatomic, strong) IBOutlet NSButton *syncButton;

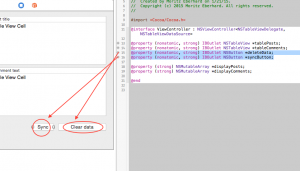
Connect these properties with the according button of the storyboard using the drag and drop feature of Xcode:

Connecting the properties with the buttons of the storyboard (coredata tutorial part)

Connecting the properties with the buttons of the storyboard

The implementation of ViewController.m looks like this:

#import "ViewController.h"
#import "Post.h"
#import "PostComment.h"

@implementation ViewController

- (void)viewDidLoad {
    [super viewDidLoad];

    // Do any additional setup after loading the view.
    [self.tablePosts setDelegate:self];
    [self.tablePosts setDataSource:self];
    [self.tableComments setDelegate:self];
    [self.tableComments setDataSource:self];

    [self.deleteData setTarget:self];
    [self.deleteData setAction:@selector(buttonDeleteDataClick)];
    [self.syncButton setTarget:self];
    [self.syncButton setAction:@selector(syncButtonClick)];

    [[NSNotificationCenter defaultCenter] addObserver:self selector:@selector(setPostsToDisplay:) name:@"showPosts" object:nil];

    [[NSNotificationCenter defaultCenter] addObserver:self selector:@selector(setCommentsToDisplay:) name:@"showComments" object:nil];
}

- (void)setRepresentedObject:(id)representedObject {
    [super setRepresentedObject:representedObject];

    // Update the view, if already loaded.
}

- (void)setPostsToDisplay:(NSNotification*)notification {
    self.displayPosts = [notification object];
    [self.tablePosts reloadData];
}

- (void)setCommentsToDisplay:(NSNotification*)notification {
    self.displayComments = [notification object];
    [self.tableComments reloadData];
}

- (NSView*)tableView:(NSTableView *)tableView viewForTableColumn:(NSTableColumn *)tableColumn row:(NSInteger)row {

    NSTableCellView *cellView = [tableView makeViewWithIdentifier:tableColumn.identifier owner:self];

    if ([tableView.identifier isEqualToString:@"TablePosts"]) {
        Post *post = [self.displayPosts objectAtIndex:row];
        if ([tableColumn.identifier isEqualToString:@"ColumnPostId"]) {
            cellView.textField.integerValue = [post.postId integerValue];
        }
        else if ([tableColumn.identifier isEqualToString:@"ColumnPostTitle"]) {
            cellView.textField.stringValue = post.title;
        }
    } else if ([tableView.identifier isEqualToString:@"TableComments"]) {
        PostComment *pcom = [self.displayComments objectAtIndex:row];
        if ([tableColumn.identifier isEqualToString:@"ColumnCommentId"]) {
            cellView.textField.integerValue = [pcom.comId integerValue];
        } else if ([tableColumn.identifier isEqualToString:@"ColumnCommentText"]) {
            cellView.textField.stringValue = pcom.text;
        }
    }
    return cellView;
}

- (NSInteger)numberOfRowsInTableView:(NSTableView *)tableView {
    if ([tableView.identifier isEqualToString:@"TablePosts"]) {
        return [self.displayPosts count];
    } else if ([tableView.identifier isEqualToString:@"TableComments"]) {
        return [self.displayComments count];
    }
    return 0;
}

- (void)tableViewSelectionDidChange:(NSNotification *)notification {
    if ([[notification.object identifier] isEqualToString:@"TablePosts"]) {
        NSInteger row = [notification.object selectedRow];
        NSTextField *tf = [[[notification.object viewAtColumn:0 row:row makeIfNecessary:NO] subviews] lastObject];
        NSNumber *postId = [NSNumber numberWithInt:(int)[tf integerValue]];
        [[NSNotificationCenter defaultCenter] postNotificationName:@"getComments" object:postId];
    }
}

- (void)buttonDeleteDataClick {
    [[NSNotificationCenter defaultCenter] postNotificationName:@"flushData" object:nil];
}

- (void)syncButtonClick {
    [[NSNotificationCenter defaultCenter] postNotificationName:@"syncData" object:nil];
}

@end

We added “setDelegate” and “setAction” for the two buttons. Furthermore, there are methods which are handling the clicks on these buttons “buttonDeleteDataClick” and “syncButtonClick”. Both post notifications which will trigger the according action. Another change (compared to the previous step of the tutorial) is in the method “viewForTableColumn”. Since we generated the model classes via coredata, postId is not an NSInteger but a NSNUmber. This means, we should access the id via method “[post.postId integerValue]” rather than “post.postId”.

After running the application, you should be able to sync and delete data. If new posts or comments are available on the blog, one click on sync will get that data! From now you could implement further logic to receive more information on posts and comments, or to update changed contents, or to even regard changed contents on update procedures.

The whole content is available at GitHub, click here.

Other parts of the tutorial:

First step: Implemented the basic application logic, posts and comments exist only as mock-data. Click here to view the post.

Second step: Connecting the application to a wordpress blog so it used the service. Click here to view the post.
Objective-c tutorial – Second part – add Rest JSON API

This part of the tutorial explains, how to add a Rest JSON API to an already created application, which shows posts and comments for a blog. In this tutorial we will connect the application with the rest API of an actual WordPress blog, so we can view the posts and comments of the blog rather than the mock data.

It requires you to be done with the first step of the tutorial.

Adding Rest JSON API to a wordpress blog

A wordpress blog has a native XMLRPC API. I didn’t want ot use it, because consuming XMLRPC services doesn’t seem straight forward in objective-c without using additional libraries. That’s why I decided to install a plugin on my blog, which adds a Rest JSON API. You can find the plugin here (and some extended documentation here).

After installation, you should be able to open /wp-json/posts/ at your blog – this will return the existing posts (latest 10 entries). Additionally, you can use /wp-json/posts/131/comments to view the comments of a post. The number 131 represents the ID of a certain post.

Objective-c implementation

Let’s implement the services in the application, so we can view real posts and comments instead of the mock-data. Open the implementation of AppDelegate and do some objective-c coding.

AppDelegate.m

#import "AppDelegate.h"
#import "Post.h"
#import "PostComment.h"

@interface AppDelegate ()

@end

@implementation AppDelegate

- (void)applicationDidFinishLaunching:(NSNotification *)aNotification {
    // Insert code here to initialize your application

    [[NSNotificationCenter defaultCenter] addObserver:self selector:@selector(getCommentsForPostId:) name:@"getComments" object:nil];

    NSMutableArray *tempPosts = [NSMutableArray array];

    NSURL *url = [NSURL URLWithString:@"http://meberhard.me/wp-json/posts"];
    NSURLRequest *request = [NSURLRequest requestWithURL:url];
    [NSURLConnection sendAsynchronousRequest:request queue:[NSOperationQueue mainQueue] completionHandler:^(NSURLResponse *repsone, NSData *data, NSError *connectionError) {
        if (data.length > 0 && connectionError == nil) {
            NSDictionary *wpPosts = [NSJSONSerialization JSONObjectWithData:data options:0 error:NULL];
            for (id key in wpPosts) {
                NSInteger postId = [[key objectForKey:@"ID"] integerValue];
                NSString *postTitle = [key objectForKey:@"title"];
                Post *tempPost = [[Post alloc] initWithIdAndTitle:postId title:postTitle];
                [tempPosts addObject:tempPost];
            }
        }
        [[NSNotificationCenter defaultCenter] postNotificationName:@"showPosts" object:tempPosts];
    }];

    }

- (void)applicationWillTerminate:(NSNotification *)aNotification {
    // Insert code here to tear down your application
}

- (void)getCommentsForPostId:(NSNotification*)notification {
    NSMutableArray *commentsToShow = [NSMutableArray array];
    NSNumber *postId = [notification object];

    NSString *restUrl = [NSString stringWithFormat:@"http://meberhard.me/wp-json/posts/%ld/comments", [postId integerValue]];

    NSURL *url = [NSURL URLWithString:restUrl];
    NSURLRequest *request = [NSURLRequest requestWithURL:url];
    [NSURLConnection sendAsynchronousRequest:request queue:[NSOperationQueue mainQueue] completionHandler:^(NSURLResponse *response, NSData *data, NSError *connectionError) {
        if (data.length > 0 && connectionError == nil) {
            NSDictionary *wpComments = [NSJSONSerialization JSONObjectWithData:data options:0 error:NULL];
            for (id key in wpComments) {
                NSInteger commentId = [[key objectForKey:@"ID"] integerValue];
                NSMutableString *commentText = [[NSMutableString alloc] init];
                [commentText appendString:[key objectForKey:@"content"]];
                PostComment *pcom = [[PostComment alloc] initPostCommentWithComIdAndPostId:commentId postId:[postId integerValue] text:commentText];
                [commentsToShow addObject:pcom];
            }
        }
        [[NSNotificationCenter defaultCenter] postNotificationName:@"showComments" object:commentsToShow];
    }];
}

@end

All instructions to create mock-data are now removed. Instead, we added a variable “tempPosts”, which will store the posts as we receive them from the Rest JSON API. The following lines request the posts from the Rest JSON API, here it is used with my blog. The JSON response is stored in a NSDictionary. We iterate over that dictionary and create an object of “Post” for every entry, the “Post” object is added after to the “tempPosts” array. After iterating, we send the notification to show the posts, we use the array containing the posts as object for the notification.

The method “getCommentsForPostId” works in a similar way. We just use a different URL and also add the id of the post to the Rest JSON API call. After iterating over the response, we send a notification and use the comments as object.

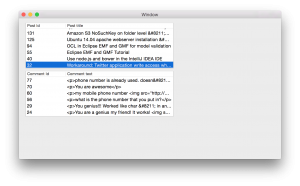
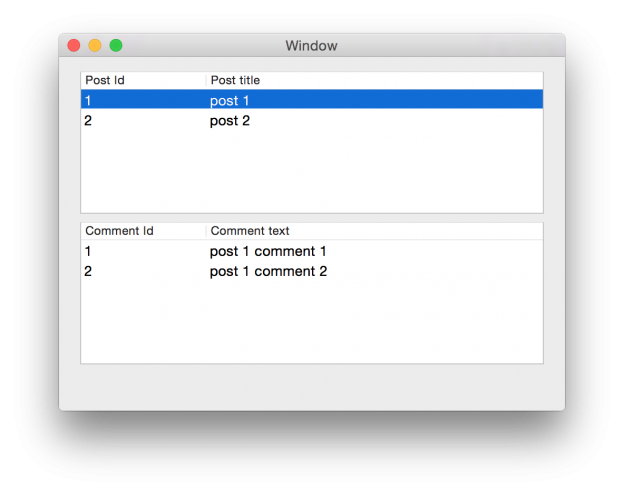
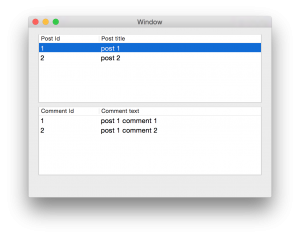
After running the application, you should be able to see the posts of your blog. If you select a post, the comments should appear in the second table:

Application after implementing the Rest JSON API

Application after implementing the Rest JSON API.

Other parts of the tutorial:

First step: Implemented the basic application logic, posts and comments exist only as mock-data. Click here to view the post.

Thid step: Implementing core data so posts and comments may be saved locally. Click here to view the post.

Application after launching it

Objective-c tutorial – First part

The first part of the objective-c tutorial focuses on the basic creation of the application. In XCode, add a new project. Select “Cocoa Application” under “OS X”.

Xcode add new project (objective-c tutorial)

Add a new project in Xcode.

The next step requires you to enter a product name. I choose “WordPressConnect”, but the name really does not matter. Everything else can be left like it is.

Add project in Xcode (objective-c tutorial)

Second step of adding the project in Xcode.

The last step requires you to select a folder, where all the sources will be saved. Click “Create” after.

Creating the View

The basic idea is to have two tables in the view (objective-c coding will follow after). The first table shows the id and the title of the post, the second table shows the id and text of a comment. After creating the project, this view can be created using the storyboard. Select the Storyboard from the project files. A view will open which shows the window.

Xcode Storyboard (objective-c tutorial)

The storyboard in the Xcode project.

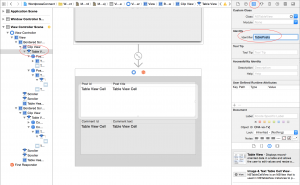
Search for “table” in the right bottom. All elements, which can be used for creating views are listed here. Drag two “Table View” elements to the area which says “View Controller”. After adding the tables, you may double click the table header area to write some headings like “Post Id”, “Post title”, “Comment Id” and “Comment Text”. After doing so, we need to add identifiers, so we know which tables is which. Select a “Table View” (very easy using the tree structure on the left side called “View Controller Scene”), select the first “Table View” and add an identifier using the inspector on the right side (third register). I used “TablePosts” as identifier.

Adding table views to the storyboard (objective-c tutorial)

Adding table views to the storyboard.

For the second table, use “TableComments” as identifier. After that, select the columns and also give them identifiers. I used the following identifiers: “ColumnPostId” and “ColumnPostTile” for the two columns in the first table. “ColumnCommentId” and “ColumnCommentText” for the two columns of the second table. The identifiers give us the possibility, to identify correct tables and columns later in the objective-c implementation.

Now we need to connect the two tables with the ViewController, in order to fill them. Open the file “ViewController.h” and add the following objective-c properties between “@interface” and “@end”:

@property (nonatomic, strong) IBOutlet NSTableView *tablePosts;
@property (nonatomic, strong) IBOutlet NSTableView *tableComments;

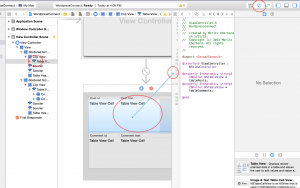
In Xcode you might see two circles next to these properties. We can use them to make the connection between the view and the variables. There is a possibility to show two files next to each other in the IDE (two circles). Click it, choose for the left side the storyboard and for the right side the file ViewController.h.

Select in the tree view on the left side of the storyboard the first “Table View”, which represents the tables for the posts. After, click within the circle of the variable “tablePosts” and drag the line onto the table of the storyboard you just selected.

Connect the storyboard with ViewController variables (objective-c tutorial)

Connect the storyboard with ViewController variables.

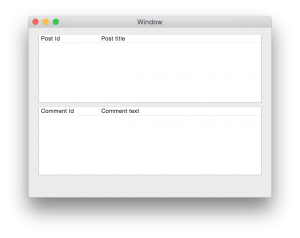
Do the same with the second table – used to display comments – and connect the variable “tableComments”. Run the application using the keys “cmd” and “R”, the following window should open:

Sample window after first run (objective-c tutorial)

Sample window after first run.

 Add the models – some objective-c coding

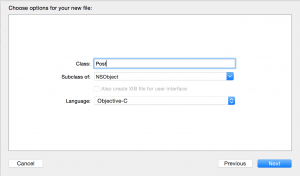
Since we want to deal with posts and comments, we are going to add very simple models for this purpose. The objective-c code will follow. In your project, add a group called “Model”. Right-click the folder, select “New File” and choose “Cocoa Class”. Call the class “Post” and select “NSObject” as “Subclass of”.

Add a class for the Posts (objective-c tutorial)

Add a class for the Posts.

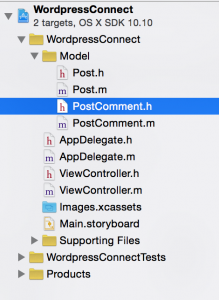
Add another class the same way and call it “PostComment”, it will be used for the comments. After doing so, the structure of your project should look like this:

Project structure after adding model classes (objective-c tutorial)

Project structure after adding model classes.

The properties and methods for the classes are rather easy. We will just store the postId, the post title, the comment id and comment text. We also need to know, to which post a comment belongs. See the objective-c code here:

Post.h

#import <Foundation/Foundation.h>

@interface Post : NSObject

@property (nonatomic, assign) NSInteger postId;
@property (strong) NSString *title;

- (id)initWithIdAndTitle:(NSInteger)postId title:(NSString*)title;

@end

Post.m

#import "Post.h"

@implementation Post

- (id)initWithIdAndTitle:(NSInteger)postId title:(NSString *)title {
    if (self = [super init]) {
        self.postId = postId;
        self.title = title;
    }
    return self;
}

@end

PostComment.h

#import <Foundation/Foundation.h>

@interface PostComment : NSObject

@property (nonatomic, assign) NSInteger comId;
@property (nonatomic, assign) NSInteger postId;
@property (strong) NSString *text;

- (id)initPostCommentWithComIdAndPostId:(NSInteger)comId postId:(NSInteger)postId text:(NSString*)text;

@end

PostComment.m

#import "PostComment.h"

@implementation PostComment

- (id)initPostCommentWithComIdAndPostId:(NSInteger)comId postId:(NSInteger)postId text:(NSString *)text {
    if (self = [super init]) {
        self.comId = comId;
        self.postId = postId;
        self.text = text;
    }
    return self;
}

@end

The classes contain the properties, which store the required information and method for creating object instances. Let’s add some Posts and Comments at runtime. Open to “AppDelegate.m”. The method “applicationDidFinishLaunching” will be called after the application launched (huh, qu’elle surprise). We can use this method to create some Posts and PostComments as mock-data after the application launched. First, import “Post.h” and “PostComment.h”. After, add some objective-c code to create the required objects:

AppDelegate.h

#import <Cocoa/Cocoa.h>

@interface AppDelegate : NSObject <NSApplicationDelegate>

@property (strong) NSMutableArray *allPosts;
@property (strong) NSMutableArray *allComments;

@end

AppDelegate.m

#import "AppDelegate.h"
#import "Post.h"
#import "PostComment.h"

@interface AppDelegate ()

@end

@implementation AppDelegate

- (void)applicationDidFinishLaunching:(NSNotification *)aNotification {
    // Insert code here to initialize your application

    Post *post1 = [[Post alloc]initWithIdAndTitle:1 title:@"post 1"];
    Post *post2 = [[Post alloc]initWithIdAndTitle:2 title:@"post 2"];

    PostComment *pcom1 = [[PostComment alloc]initPostCommentWithComIdAndPostId:1 postId:1 text:@"post 1 comment 1"];
    PostComment *pcom2 = [[PostComment alloc]initPostCommentWithComIdAndPostId:2 postId:1 text:@"post 1 comment 2"];
    PostComment *pcom3 = [[PostComment alloc]initPostCommentWithComIdAndPostId:3 postId:2 text:@"post 2 comment 2"];

    self.allPosts = [NSMutableArray arrayWithObjects:post1, post2, nil];
    self.AllComments = [NSMutableArray arrayWithObjects:pcom1, pcom2, pcom3, nil];

    NSLog(@"%@", post1.title);
    NSLog(@"%@", pcom1.text);
    NSLog(@"%@", pcom3.text);
    NSLog(@"%ld", (long)pcom2.postId);
    NSLog(@"%ld", (long)pcom3.comId);

    }

- (void)applicationWillTerminate:(NSNotification *)aNotification {
    // Insert code here to tear down your application
}

@end

In the header file – AppDelegate.h – we just added two properties in objective-c. They are used to store all posts and comments. In the implementation file – AppDelegate.m – we add two posts and three comments. After, we output some information of these objects, just to be sure, that everything works fine. If you run the application like it is, you will see the information in the output window of Xcode.

Connecting the data with the view – some more objective-c

The only thing left is to connect the two tables of the view with the data, so we output the posts and comments. The view should work like this: After launching the application, the first table should show all available posts. If the user clicks a row of the table, thus selects a post, the second table should show all comments assigned to this post. In order to work with “NSTableView”, we are required to implemented the protocols NSTableViewDelegate and NSTableViewDataSource (I linked the terms to the official Apple documentation). We just need to tell the interface of the ViewController, that we will implement the methods of these protocols. It looks like this in the header file:

ViewController.h

#import <Cocoa/Cocoa.h>

@interface ViewController : NSViewController<NSTableViewDelegate, NSTableViewDataSource>

@property (nonatomic, strong) IBOutlet NSTableView *tablePosts;
@property (nonatomic, strong) IBOutlet NSTableView *tableComments;

@property (strong) NSMutableArray *displayPosts;
@property (strong) NSMutableArray *displayComments;

@end

We added two properties: “displayPosts” and “displayComments”. We will use them to store the currently displayed posts and comments.
The implementation looks like this (explanation under):

ViewController.m

#import "ViewController.h"
#import "Post.h"
#import "PostComment.h"

@implementation ViewController

- (void)viewDidLoad {
    [super viewDidLoad];

    // Do any additional setup after loading the view.
    [self.tablePosts setDelegate:self];
    [self.tablePosts setDataSource:self];
    [self.tableComments setDelegate:self];
    [self.tableComments setDataSource:self];

    [[NSNotificationCenter defaultCenter] addObserver:self selector:@selector(setPostsToDisplay:) name:@"showPosts" object:nil];

    [[NSNotificationCenter defaultCenter] addObserver:self selector:@selector(setCommentsToDisplay:) name:@"showComments" object:nil];
}

- (void)setRepresentedObject:(id)representedObject {
    [super setRepresentedObject:representedObject];

    // Update the view, if already loaded.
}

- (void)setPostsToDisplay:(NSNotification*)notification {
    self.displayPosts = [notification object];
    [self.tablePosts reloadData];
}

- (void)setCommentsToDisplay:(NSNotification*)notification {
    self.displayComments = [notification object];
    [self.tableComments reloadData];
}

- (NSView*)tableView:(NSTableView *)tableView viewForTableColumn:(NSTableColumn *)tableColumn row:(NSInteger)row {
    NSTableCellView *cellView = [tableView makeViewWithIdentifier:tableColumn.identifier owner:self];

    if ([tableView.identifier isEqualToString:@"TablePosts"]) {
        Post *post = [self.displayPosts objectAtIndex:row];
        if ([tableColumn.identifier isEqualToString:@"ColumnPostId"]) {
            cellView.textField.integerValue = post.postId;
        }
        else if ([tableColumn.identifier isEqualToString:@"ColumnPostTitle"]) {
            cellView.textField.stringValue = post.title;
        }
    } else if ([tableView.identifier isEqualToString:@"TableComments"]) {
        PostComment *pcom = [self.displayComments objectAtIndex:row];
        if ([tableColumn.identifier isEqualToString:@"ColumnCommentId"]) {
            cellView.textField.integerValue = pcom.comId;
        } else if ([tableColumn.identifier isEqualToString:@"ColumnCommentText"]) {
            cellView.textField.stringValue = pcom.text;
        }
    }
    return cellView;
}

- (NSInteger)numberOfRowsInTableView:(NSTableView *)tableView {
    if ([tableView.identifier isEqualToString:@"TablePosts"]) {
        return [self.displayPosts count];
    } else if ([tableView.identifier isEqualToString:@"TableComments"]) {
        return [self.displayComments count];
    }
    return 0;
}

- (void)tableViewSelectionDidChange:(NSNotification *)notification {
    if ([[notification.object identifier] isEqualToString:@"TablePosts"]) {
        NSInteger row = [notification.object selectedRow];
        NSTextField *tf = [[[notification.object viewAtColumn:0 row:row makeIfNecessary:NO] subviews] lastObject];
        NSNumber *postId = [NSNumber numberWithInt:(int)[tf integerValue]];
        [[NSNotificationCenter defaultCenter] postNotificationName:@"getComments" object:postId];
    }
}

@end

Alright – here we have some more things. The first method “viewDidLoad” sets the delegate and datasource to itself. Like this we define, that the methods of the protocols for the tableviews are implemented in this class. After, there are two observers. They listen to the methods “showPosts” and “showComments”, which we will later send from the implementation of AppDelegate. Short explanation: When we send a notification with the name “showPosts”, it will call the method “setPostsToDisplay”. If we send a notification with the name “ShowComments”, it will call the method “setCommentsToDisplay”. This is an easy way to communicate between AppDelegate and ViewController, without the need to call methods on explicit instances.

Ignore the next method “setRepresentedObject”. The two methods after are “setPostsToDisplay” and “setCommentsToDisplay”. Here we receive the posts or comments from the notification object, set “displayPosts” or “displayComments” and reload accordingly the table view.

The method after is called “viewForTableColumn” is the actual implementation of the protocol “NSTableViewDelegate” (click here for the documentation). This method returns a cell view (it will be called for every row). We have several if-statements here. We use them in order to find out, which table and column is currently requested. Therefore we use the identifiers, which we declared earlier using the storyboard.

numberOfRowsInTableView” is an implementation of the protocol called “NSTableViewDataSource” (click here for the documentation). It returns the number of rows we want to create in the table. For the first table this would be the amount of posts and for the second table the amount comments.

The last method “tableViewSelectionDidChange” is another implementation of “NSTableViewDelegate”. It is called whenever the user selects a row in the table. In our case, we can use it if the user selects a certain post in the first table, to display the comments accordingly in the second table. For this reason, we get the ID of the post which the user selected and send a notification which contains this id. In appDelegate we can look for the comments for this postId and give them back to the ViewController.

The last step is to update AppDelegate:

 AppDelegate.m

#import "AppDelegate.h"
#import "Post.h"
#import "PostComment.h"

@interface AppDelegate ()

@end

@implementation AppDelegate

- (void)applicationDidFinishLaunching:(NSNotification *)aNotification {
    // Insert code here to initialize your application

    Post *post1 = [[Post alloc]initWithIdAndTitle:1 title:@"post 1"];
    Post *post2 = [[Post alloc]initWithIdAndTitle:2 title:@"post 2"];

    PostComment *pcom1 = [[PostComment alloc]initPostCommentWithComIdAndPostId:1 postId:1 text:@"post 1 comment 1"];
    PostComment *pcom2 = [[PostComment alloc]initPostCommentWithComIdAndPostId:2 postId:1 text:@"post 1 comment 2"];
    PostComment *pcom3 = [[PostComment alloc]initPostCommentWithComIdAndPostId:3 postId:2 text:@"post 2 comment 2"];

    self.allPosts = [NSMutableArray arrayWithObjects:post1, post2, nil];
    self.allComments = [NSMutableArray arrayWithObjects:pcom1, pcom2, pcom3, nil];

    [[NSNotificationCenter defaultCenter] postNotificationName:@"showPosts" object:self.allPosts];

    [[NSNotificationCenter defaultCenter] addObserver:self selector:@selector(getCommentsForPostId:) name:@"getComments" object:nil];

    }

- (void)applicationWillTerminate:(NSNotification *)aNotification {
    // Insert code here to tear down your application
}

- (void)getCommentsForPostId:(NSNotification*)notification {
    NSMutableArray *commentsToShow = [NSMutableArray array];
    NSNumber *postId = [notification object];
    for (PostComment *pcom in self.allComments) {
        if (pcom.postId == [postId integerValue]) {
            [commentsToShow addObject:pcom];
        }
    }
    [[NSNotificationCenter defaultCenter] postNotificationName:@"showComments" object:commentsToShow];
}

@end

I deleted the NSLog instructions which were there previously. Instead, we have now to instructions for notifications. The first one sends a notification using the name “showPosts” and as object all posts, because we want to display all posts when the application launches. The second one is an observer, which listens for a notification called “getComments”. This notification will be sent from the ViewController, when the user selects a row. In AppDelegate, this will result in the method “getCommentsForPostId”. This method gets all comments which are assigned to the current postId. It will then send a notification called “showComments” and the selected comments as an object. This notification will cause ViewController to display these comments in the second table.

If everything went right you should see the posts and comments after launching the application.

Application after launching it (objective-c tutorial)

Application after launching it

Other parts of the tutorial:

Second step: Connecting the application to a wordpress blog so it used the service. Click here to view the post.
Thid step: Implementing core data so posts and comments may be saved locally. Click here to view the post.
Amazon Web-Service (AWS) and Typo3: Hosting, Deployment methods and continuous integration

The following article gives a brief overview of a strategy used for Typo3 hosting and deployment using Amazon Web-Services (AWS,) and the methods used to continuously deploy new versions of the system.

AWS components usage

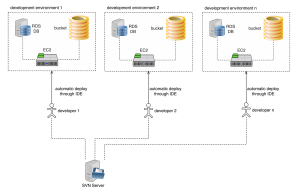
Assuming that the setup uses development, staging and live environments. The following picture shows the setup of the development instances. Every developer could use an own EC2 instance, a RDS database and a S3 bucket. AWS offers the “micro” plan, so these instances should not cause a lot of costs. The developer environment can be easily replicated by copying the EC2, RDS and S3 components.

AWS Typo hosting and deployment: AWS Typo3 development environment.The image illustrates, that every developer can work on their own instance while sharing the sources on SVN. The SVN structure is rather easy for such a project. The following two folders are sufficient:

  • configuration: Stores all configuration files like “LocalConfiguration.php” or real_url configuration files
  • extensions: Stores all extbase extensions which contain the functionality of the system

Note that you can use an extension also for storing all templates, css and javascript files. This way, the fileadmin is obsolete for storing such information and can be excluded completely from SVN. In such a project, the fileadmin is used solely for media files like images and videos and resides in the cloud as a S3 bucket.

Use S3 bucket for storing media files

In order to connect the Typo3 system to a S3 bucket, the following extension can be used, click here. After installing, a new storage can be added in the backend clicking on “List” and after on the first item of the list. Locate the list “File Storage” and add a new one. Give it a name and switch to the “Configuration” tab. From the “Driver” dropdown, choose “Amazon S3” and fill out the required information concerning the bucket you are using. If you want to only host media files in the cloud, you can even deactivate the preset “fileadmin” file storage and make the other one the default one. After refreshing the backend, a click on “Filelist” should now display all files of the bucket. Note: If you transition from local fileadmin use to bucket use, you can just copy all files from fileadmin to the bucket, add the file storage for the bucket and remove the fileadmin file storage. File references are kept after, instead of serving files locally Typo3 should now serve them from the bucket.
Additional note: Sometimes, when copying or uploading files to the bucket, it does not add keys, so the Typo3 backend might throw an Exception like “NoSuchKey Exception”. Follow the solution explained here in such a case.

Stage and live environment

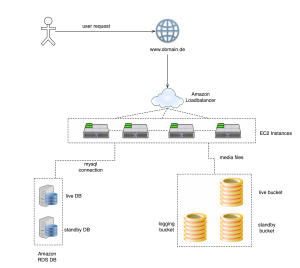
In this setup the stage environment is used to test new functionality and to add content. Since there is no requirement for handling load, the stage environment is exactly the same like a dev environment, having an EC2 instance, S3 bucket and a RDS database. The live environment contains an EC2 instance including load balancer, two S3 buckets and two RDS databases. The following image illustrates this:

AWS Typo hosting and deployment: Typo3 AWS Live Environment

The user requests the domain via browser, the Amazon load balancer assign an EC2 instance. The section called “Deployment procedure for live” explains the necessity of having two live DBs and two live buckets.

Deployment procedure for stage

The deployment should work in a mostly automatic way, therefore SVN branches and a deployment tool like phing can be used. Note, that this works also with other source code versioning and deployment tools. Here is an example phing script, which is used for deployment:

<?xml version="1.0" encoding="UTF-8"?>
<project name="project-name" default="dist">

    <target name="dist" description="The build file used to deploy on staging.">

        <fail unless="svnversion" message="Property 'svnversion' not defined." />

        <!-- Export the latest SVN branch -->
        <echo message="Checking out the SVN branch..." />
        <svnexport
                repositoryurl="svn://svn-domain/project-name/branches/${svnversion}"
                force="true"
                username="user"
                password="pass"
                nocache="true"
                todir="/local-path/phing/project-name"
                >
        </svnexport>

        <!-- Deploy the configuration files -->
        <echo message="Deploying configuration files on staging..." />
        <ftpdeploy
                host="host"
                port="port"
                username="user"
                password="pass"
                dir="/server-dir/public_html/typo3conf">
            <fileset dir="/local-path/phing/project-name/configuration">
                <include name="AdditionalConfiguration.php"/>
                <include name="LocalConfiguration.php" />
            </fileset>
        </ftpdeploy>

        <!-- Deploy the plugins -->
        <echo message="Deploying the plugins on staging..." />
        <ftpdeploy
                host="host"
                port="port"
                username="user"
                password="pass"
                dir="/server-dir/public_html/typo3conf/ext"
                depends="true">
            <fileset dir="/local-path/phing/project-name/extensions">
                <include name="tx_extension_1/**"/>
                <include name="tx_extension_2/**" />
                <include name="tx_extension_3/**" />
                <exclude name="tx_extension_1/Configuration/TypoScript/domainspecific.txt" />
            </fileset>
        </ftpdeploy>

        <!-- Clear cache on staging -->
        <echo message="Clear cache on staging..." />
        <exec command="sh /local-path/phing/helpers/clearcache.sh" />
        <echo message="Cache cleared on staging." />

        <!-- Clean up after the deploy, delete the contents of project-name -->
        <echo message="Deleting the SVN export directory..." />
        <delete dir="/local-path/phing/project-name" verbose="true" includeemptydirs="true">
        </delete>

        <mail from="deploy@your-server.com" message="Deployed version ${svnversion} on domain.com"
              subject="Deployed successfully version ${svnversion} on domain.com"
              tolist="email1@email.com,email2@ email.com">
            Build process successful.
        </mail>

        <echo message="Deploy done." />

    </target>

</project>

Explanations about this build script: Line 6 causes the build script to fail, if the user didn’t specify the svnversion, that should be deployed. Usually, the phing build script can be called on command line by using the command “phing” while being in the directory, where the file build.xml resides. Additionally for this script the user should specify the svnversion, so the command could look like this “phing -Dsvnversion=Project_v1.15”, if there is a SVN branch called “Project_v1.15”. “svnexport” starting on line 10 exports the specified SVN branch and saves the files locally. “ftpdeploy” starting from line 22 loads the configuration files to the staging server. Like specified above, the SVN has two folders:

  • configuration
  • extensions

The “ftpdeploy” instructions deploy the configuration files directly to the folder “typo3conf” on the staging server. In “fileset” starting from line 28 all files need to be included, which should be deployed. The “ftpdeploy” instructions starting from line 36 deploy the plugins to “typ3conf/ext” on the staging server. Include the plugin folders within “fileset”, the wildcard as seen in “tx_extension_1/**” will include all subfolders and files recursively. The “exclude” instruction can be used to exclude files which contain domainspecific information, because staging, development and live environments probably use different domains. After deploying configuration and plugin files, an additional script is called which clears the cache on the staging server. The content of the shell script looks like this:

ssh -i AWSkey.pem ubuntu@public-EC2-name.compute.amazonaws.com << EOF
    sudo -s
    cd /path-to-typo3system/
    ./typo3/cli_dispatch.phpsh extbase cacheapi:clearallexceptpagecache
    exit
    exit
EOF

This script logins via shell to the EC2 instance and uses the Typo3-cli to clear the cache. Note: “cacheapi” is not included in the basic typo3 installation. You will need to install the additional plugin called “extcoreapi”, which will add such functionality. This extension can be found here.

Deployment procedure for live

Like stated above, the live instance has two database and two buckets. In the public_html folder, you can add a new folder, called “deployment” and inside this folder two subfolders which are called “deployment_1” and “deployment_2”. These folders can contain the SVN export, in our case the folders “configuration”, containing configuration files and “extensions”, containing Typo3 extensions. Every time the deployment mechanism should switch the deployment folder: First time the deploy is started, it will export the SVN branch to “deployment_1”, the second time it will export to “deployment_2” and the third time again to “deployment_1”, etc. We use symlinks, to create links for configuration files in typo3conf/ and for the extensions in typo3conf/ext. This procedure has the benefit of exchanging the symlinks very fast, if a deploy didn’t work and crashes the system. Imagine, you just deployed and the folder “deployment_2” was used, so deployment_2 is also used for the symlinks. If Something doesn’t work, just switch the symlinks back to “deployment_1” in order to rollback to the last working version.

Additionally, we use two databases and two buckets. In my case, I created an additional configuration file which is called “LocalConfiguration_DB.php”. This configuration files exists both in “deployment_1” and “deployment_2”. The configuration file in “deployment_1” contains the database information for the first database, the configuration file in “deployment_2” contains database information for the second database. Additionally, the first database contains the connection information for the first bucket and the second database contains the connection information for the second bucket. Every time, when the folder “deployment_1” is used for deploying, it will automatically connect to the first database and to the first bucket. When using “deployment_2”, it will use the second database and the second bucket.

Here is a sample phing build script, which updates the live bucket, database and filesystem from the stage server. Before viewing the build script, note that I use additionally the following three properties files:

  • bucket.properties, the file contains “lastDeployedBucket=bucketName1”
  • database.properties, the file contains “lastDeployedDatabase=typo3db1”
  • filesystem.properties, the file contains “lastDeployedFilesystem=deployment_1”

The files store the last used bucket, database and filesystem, so the phing script chooses the other filesystem, database and bucket for the consecutive deploy.

<?xml version="1.0" encoding="UTF-8"?>
<project name="project-name" default="dist">

    <target name="dist" description="The build file used to deploy on live.">

        <fail unless="svnversion" message="Property 'svnversion' not defined." />

        <!-- Checking the last deployed bucket, database and filesystem
         It is very important, that the numbers of all items are the same.
         It should be for example
         typo3db1
         bucketName1
         deployment_1

         OR
         typo3db2
         bucketName2
         deployment_2

         in the same time. A mix is not allowed and will stop the build.
         -->
        <property file="/path-to-folder/helpers/bucket.properties" />
        <property file="/path-to-folder/helpers/database.properties" />
        <property file="/path-to-folder/helpers/filesystem.properties" />

        <if>
            <and>
                <equals arg1="${lastDeployedDatabase}" arg2="typo3db1" />
                <equals arg1="${lastDeployedBucket}" arg2="bucketName1" />
                <equals arg1="${lastDeployedFilesystem}" arg2="deployment_1" />
            </and>
            <then>
                <property name="deployDatabase" value="typo3db2" override="false" />
                <property name="deployBucket" value="bucketName2" override="false" />
                <property name="deployFilesystem" value="deployment_2" override="false" />
            </then>

            <elseif>
                <and>
                    <equals arg1="${lastDeployedDatabase}" arg2="typo3db2" />
                    <equals arg1="${lastDeployedBucket}" arg2="bucketName2" />
                    <equals arg1="${lastDeployedFilesystem}" arg2="deployment_2" />
                </and>
                <then>
                    <property name="deployDatabase" value="typo3db" override="false" />
                    <property name="deployBucket" value="bucketName1" override="false" />
                    <property name="deployFilesystem" value="deployment_1" override="false" />
                </then>
            </elseif>

            <else>
                <fail message="Bucket, Database and Filesystem got mixed up in a previous deploy. Please fix this manually before trying to deploy automatically again." />
            </else>
        </if>

        <fail unless="deployDatabase" message="Property 'deployDatabase' not defined." />
        <fail unless="deployBucket" message="Property 'deployBucket' not defined." />
        <fail unless="deployFilesystem" message="Property 'deployFilesystem' not defined." />

        <!-- Export the latest SVN branch -->
        <echo message="Checking out the SVN branch..." />
        <svnexport
                repositoryurl="svn://svn-domain/project-name/branches/${svnversion}"
                force="true"
                username="user"
                password="pass"
                nocache="true"
                todir="/local-path/phing/project-name-live"
                >
        </svnexport>

        <!-- Deploy the configuration files -->
        <echo message="Deploying configuration files on live..." />
        <ftpdeploy
                host="host"
                port="port"
                username="user"
                password="pass"
                dir="/server-dir/public_html/deployment/${deployFilesystem}/configuration">
            <fileset dir="/local-path/phing/project-name-live/configuration">
                <include name="AdditionalConfiguration.php"/>
                <include name="LocalConfiguration.php" />
            </fileset>
        </ftpdeploy>

        <!-- Deploy the plugins -->
        <echo message="Deploying the plugins on live..." />
        <ftpdeploy
                host="host"
                port="port"
                username="user"
                password="pass"
                dir="/server-dir/public_html/00deployment/${deployFilesystem}/extensions"
                depends="true">
            <fileset dir="/local-path/phing/project-name-live/extensions">
                <include name="tx_extension_1/**"/>
                <include name="tx_extension_2/**" />
                <include name="tx_extension_3/**" />
                <exclude name="tx_extension_1/Configuration/TypoScript/domainspecific.txt" />
            </fileset>
        </ftpdeploy>

        <!-- Run content update on database -->
        <echo message="Starting to export content from staging..." />
        <exec command="mysqldump -uUSER -pPASS -hHOST typo3db --tables pages pages_language_overlay sys_file sys_filemounts sys_file_collection sys_file_metadata sys_file_processedfile sys_file_reference sys_language sys_refindex sys_registry sys_template tt_content tx_dce_dcefield_sectionfields_mm tx_dce_dce_dcefield_mm tx_dce_domain_model_dce tx_dce_domain_model_dcefield tx_l10nmgr_cfg tx_l10nmgr_exportdata tx_l10nmgr_index tx_l10nmgr_priorities tx_extension_table1 tx_extension_table2 > /local-path/phing/project-name-live/export.sql" />
        <echo message="Importing content to live database ${deployDatabase} ..." />
        <exec command="mysql -uUSER -pPASS -hHOST ${deployDatabase} &lt; /local-path/phing/project-name-live/export.sql" />
        <echo message="Content update on database done." />

        <!-- Synchronize the S3 bucket -->
        <echo message="Starting to synchronize the S3 bucket ${deployBucket} ..." />
        <exec command="aws s3 sync s3://bucketStage s3://${deployBucket} --delete --recursive --acl bucket-owner-full-control" />
        <echo message="S3 Synchronize done." />

        <!-- Clean up after the deploy, delete the contents of folder /local-path/phing/project-name-live -->
        <echo message="Deleting the SVN export directory..." />
        <delete dir="/local-path/phing/project-name-live" verbose="true" includeemptydirs="true">
        </delete>

        <!-- Creating symlinks for the deployed filesystem and database.
        Please note, that the "typo3db1" is wired to bucket "bucketName1" and
        "typo3db2" is wired to bucket "bucketName2" -->
        <echo message="Creating Symlinks for the deployed version and database" />
        <exec command="sh /local-path/phing/helpers/updatesymlinks.sh ${deployFilesystem}" />
        <echo message="Created the symlinks." />

        <!-- Now we will change the content of the property files -->
        <echo message="Starting to update the properties files" />
        <exec command="> /local-path/phing/helpers/bucket.properties" />
        <exec command="echo &quot;lastDeployedBucket=${deployBucket}&quot;> /local-path/phing/helpers/bucket.properties" />
        <exec command="> /local-path/phing/helpers/database.properties" />
        <exec command="echo &quot;lastDeployedDatabase=${deployDatabase}&quot;> /local-path/phing/helpers/database.properties" />
        <exec command="> /local-path/phing/helpers/filesystem.properties" />
        <exec command="echo &quot;lastDeployedFilesystem=${deployFilesystem}&quot;> /local-path/phing/helpers/filesystem.properties" />
        <echo message="Updated the properties files" />

        <mail from="deploy@your-domain.com" message="Deployed version ${svnversion} on domain-name.com"
              subject="Deployed successfully version ${svnversion} on domain-name.com"
              tolist="email1@email.com, email2@email.com">
            Build process successful.

            Currently used filesystem: /server-dir/public_html/deployment/${deployFilesystem}
            Currently used bucket: ${deployBucket}
            Currently used database: ${deployDatabase}

            In order to rollback to the previous version, ssh to your-domain.com and execute the following command:
            sh /local-path/phing/helpers/updatesymlinks.sh ${lastDeployedFilesystem}
        </mail>

        <echo message="Deploy done." />

    </target>

</project>

Line 22, 23 and 24 read the property files. Line 26 to 54 checks the defined properties of the property files. If the previous deploy used filesytem_1, bucketName1 and typo3db1, it will set the properties to deploy this time to filesytem_2, bucketName2 and typo3db2 and vice versa. The script fails, if these properties are not set or mixed up. After, from line 61 to 101 works similar to the stage-deploy script. First, it exports the SVN branch. After, it will upload the files to the live server, but it uses the folders “public_html/deployment/deployment_1” and “public_html/deployment/deployment_2” instead of deploying directly to “typo3conf” and “typo3conf/ext”. The lines 104 to 108 export certain tables from the stage database server, you can define here the tables which contain content. After, it imports those tables to the live server. Line 110 to 113 update the live-bucket according to the content of the stage-bucket. 115 to 118 delete the local SVN branch export, because it’s not further required. 120 to 125 execute a script which updates the symlinks, the script accepts “deployment_1” or “deployment_2” as argument.

if [ "$1" != "deployment_1" -a "$1" != "deployment_2" ]; then
    echo "The first argument needs to be either deployment_1 or deployment_2"
    exit
fi
    
ssh -i ~/AWSKey.pem ubuntu@AWSHOST.com << EOF
    sudo -s

    rm /home/USERNAME/public_html/typo3conf/AdditionalConfiguration.php
    ln -s /home/USERNAME/public_html/deployment/$1/configuration/AdditionalConfiguration.php /home/USERNAME/public_html/typo3conf/AdditionalConfiguration.php
    chown -h USERNAME:USERGROUP /home/USERNAME/public_html/typo3conf/AdditionalConfiguration.php

    rm /home/USERNAME/public_html/typo3conf/LocalConfiguration.php
    ln -s /home/USERNAME/public_html/deployment/$1/configuration/LocalConfiguration.php /home/USERNAME/public_html/typo3conf/LocalConfiguration.php
    chown -h USERNAME:USERGROUP /home/USERNAME/public_html/typo3conf/LocalConfiguration.php

    rm /home/USERNAME/public_html/typo3conf/ext/tx_extension_1
    ln -s /home/USERNAME/public_html/deployment/$1/extensions/tx_extension_1 /home/USERNAME/public_html/typo3conf/ext/tx_extension_1
    chown -h USERNAME:USERGROUP /home/USERNAME/public_html/typo3conf/ext/tx_extension_1

    rm /home/USERNAME/public_html/typo3conf/ext/tx_extension_2
    ln -s /home/USERNAME/public_html/deployment/$1/extensions/tx_extension_2 /home/USERNAME/public_html/typo3conf/ext/tx_extension_2
    chown -h USERNAME:USERGROUP /home/USERNAME/public_html/typo3conf/ext/tx_extension_2

    rm /home/USERNAME/public_html/typo3conf/ext/tx_extension_3
    ln -s /home/USERNAME/public_html/deployment/$1/extensions/tx_extension_3 /home/USERNAME/public_html/typo3conf/ext/tx_extension_3
    chown -h USERNAME:USERGROUP /home/USERNAME/public_html/typo3conf/ext/tx_extension_3

    cd /home/USERNAME/public_html/
    ./typo3/cli_dispatch.phpsh extbase cacheapi:clearallexceptpagecache
EOF

This shell script removes previous symlinks and adds symlinks for the used deployment folder, either “deployment_1” or “deployment_2”. After setting the symlinks, it calls the Typo3 CLI to delete all caches except the page-cache. Back to the phing script: Linke 128 to 135 updates the property files and writes the used filesystem, bucket and database to them, so the next time you call the deployment, the filesystem, bucket and database are switched accordingly. Line 137 to 148 sends an email and also informs inside the email, that the user can call the shell script to revert to the previous used filesystem, bucket and database in case something went wrong while deploying.

AWS S3 Bucket MP4 Videos wrong mime-type

When copying files from one bucket to another, or uploading files to a bucket, some things may go wrong. For example, some keys representing folders in the file structure go missing – a solution to this problem is explained in a different post, see it here. Recently, another problem appeared: MP4 videos embedded as HMTM5 videos played in all browsers but Internet Explorer 9. In my case this happened, because S3 returned headers which did not contain “video/mp4” as mime-type but “application/octet-stream”. This obviously stopped IE 9 from playing the videos.

How to check the mime-type of a file in S3

If you run into this problem, you can easily find out, if the mime-type is set correctly in your bucket video file. The following example uses PHP with the PHP-SDK for AWS, but you can make this example work for any programming language and the respective SDK (the SDKs can be found here).

First of all, add a simple configuration array containing your credentials and the location of your bucket. Delete the v4 line, if your region does not support it. Save the file as “config.php”.

<?php
return array(
    'includes' => array('_aws'),
    'services' => array(
        'default_settings' => array(
            'params' => array(
                'key'    => 'YOUR_KEY',
                'secret' => 'YOUR_SECRET',
                'region' => 'eu-central-1',
                'signature'    => 'v4'
            )
        )
    )
);

The following PHP script requires the Amazon PHP SDK, you can see the “autoloader” in the “require” statement. It uses the configuration file we created in the previous step, be sure that the path to the file is correct. If the file resides in the same directory and the name is “config.php”, you may leave the line like it is.

Use the variable “$params” to define the name of your bucket and the path to the mp4 file you want to check. The “echo” at the end prints the result of getting the object. The PHP script looks like this:

<?php

require 'aws/aws-autoloader.php';
use Aws\Common\Aws;

$aws = Aws::factory('config.php');
$client = $aws->get('s3');

$params = array(
    'Bucket' => 'bucket_name',
    'Key' => 'user_upload/folder_one/folder_two/file_name.mp4'
);

echo '<pre>';
var_dump($client->getObject($params));
echo '</pre>';

When executing this script, you will get a result which looks like the following:

object(Guzzle\Service\Resource\Model)#89 (2) {
  ["structure":protected]=>
  NULL
  ["data":protected]=>
  array(22) {
    ["Body"]=>
    object(Guzzle\Http\EntityBody)#92 (6) {
      ["contentEncoding":protected]=>
      bool(false)
      ["rewindFunction":protected]=>
      NULL
      ["stream":protected]=>
      resource(7) of type (stream)
      ["size":protected]=>
      NULL
      ["cache":protected]=>
      array(9) {
        ["wrapper_type"]=>
        string(3) "PHP"
        ["stream_type"]=>
        string(4) "TEMP"
        ["mode"]=>
        string(3) "w+b"
        ["unread_bytes"]=>
        int(0)
        ["seekable"]=>
        bool(true)
        ["uri"]=>
        string(10) "php://temp"
        ["is_local"]=>
        bool(true)
        ["is_readable"]=>
        bool(true)
        ["is_writable"]=>
        bool(true)
      }
      ["customData":protected]=>
      array(1) {
        ["default"]=>
        bool(true)
      }
    }
    ["DeleteMarker"]=>
    bool(false)
    ["AcceptRanges"]=>
    string(5) "bytes"
    ["Expiration"]=>
    string(0) ""
    ["Restore"]=>
    string(0) ""
    ["LastModified"]=>
    string(29) "Mon, 01 Dec 2014 13:43:25 GMT"
    ["ContentLength"]=>
    string(8) "60209681"
    ["ETag"]=>
    string(34) ""531b21ac92269de9ca9b6459bccf62a0""
    ["MissingMeta"]=>
    string(0) ""
    ["VersionId"]=>
    string(4) "null"
    ["CacheControl"]=>
    string(0) ""
    ["ContentDisposition"]=>
    string(0) ""
    ["ContentEncoding"]=>
    string(0) ""
    ["ContentLanguage"]=>
    string(0) ""
    ["ContentType"]=>
    string(9) "video/mp4"
    ["Expires"]=>
    string(0) ""
    ["WebsiteRedirectLocation"]=>
    string(0) ""
    ["ServerSideEncryption"]=>
    string(0) ""
    ["SSECustomerAlgorithm"]=>
    string(0) ""
    ["SSECustomerKeyMD5"]=>
    string(0) ""
    ["SSEKMSKeyId"]=>
    string(0) ""
    ["RequestId"]=>
    string(16) "830D3203B2E744AC"
  }
}

Here you need to view the output of “ContentType” – if it is something else than “video/mp4”, the mime-type for the mp4 video is not set correctly. Since this seems to happen sometimes when moving buckets, or when using bulk upload for many mp4 files, I wrote a script which gets all mp4 videos, checks the “ContentType” and set its to “video/mp4” if it’s not already set. The script used looks like this:

<?php

require 'aws/aws-autoloader.php';
use Aws\Common\Aws;

ob_implicit_flush(true);
ob_end_flush();

$aws = Aws::factory('config.php');
$client = $aws->get('s3');

echo "starting to get objects";
echo "<br />";

$allObjects = AWSUtil::listObjectsHelper('pwwstage', $client);

$changedKeys = array();

foreach($allObjects as $object) {
    $paramsGet = array(
        'Bucket' => 'pwwstage',
        'Key' => $object['Key'],
    );

    if (AWSUtil::endsWith($object['Key'], ".mp4")) {
        $getResult = $client->getObject($paramsGet);
        $bodyContent = $getResult['Body'];

        echo "checking key " . $object['Key'];
        echo "<br />";

        if (($getResult['ContentType']) && ($getResult['ContentType'] != 'video/mp4')) {
            $paramsPut = array(
                'Bucket' => 'pwwstage',
                'Key' => $object['Key'],
                'ContentType' => 'video/mp4',
                'Body' => $bodyContent
            );

            echo "updating contenttype on " . $object['Key'];
            echo "<br />";

            $client->putObject($paramsPut);
            array_push($changedKeys, $object['Key']);
        }
    }

}

foreach($changedKeys as $changedKey) {
    echo $changedKey;
    echo "<br />";
}

echo "done";

class AWSUtil
{
    /**
     * Helper function to receive all keys from an object, not only up to 1000
     * This works recursively
     *
     * @param string $bucket
     * * @param array $s3client
     * @param array $responseArray
     * @param string $marker
     * @return array
     */
    public static function listObjectsHelper($bucket, $s3client, $responseArray = array(), $marker = NULL)
    {

        // first call: marker is not set
        if (!$marker) {
            $responseTemp = $s3client->listObjects(array(
                'Bucket' => $bucket,
            ))->toArray();
        } else {
            $responseTemp = $s3client->listObjects(array(
                'Bucket' => $bucket,
                'Marker' => $marker
            ))->toArray();
        }

        foreach ($responseTemp['Contents'] as $res) {
            array_push($responseArray, $res);
        }

        if (count($responseTemp['Contents']) === 1000) {
            $marker = $responseTemp['Contents'][999]['Key'];
            return AWSUtil::listObjectsHelper($bucket, $s3client, $responseArray, $marker);
        } else {
            return $responseArray;
        }
    }

    public static function endsWith($haystack, $needle)
    {
        $length = strlen($needle);
        if ($length == 0) {
            return true;
        }

        return (substr($haystack, -$length) === $needle);
    }
}

Amazon S3 NoSuchKey on folder level – folders don’t exist

While working with Amazon S3 buckets and connecting them to Typo3 I stumbled into a problem: When I copy the contents to the bucket from another bucket or via tools such as BucketExplorer, the XML output (on bucketname.s3.amazonaws.com) showed all files, but not the folders. As an example:

<Contents>
  <Key>folder_one/file_one</Key>
  <LastModified>2014-11-18T14:16:19.000Z</LastModified>
  <ETag>"6e563e7cf3fda1549cb13aeae7a53b24"</ETag>
  <Size>6148</Size>
  <StorageClass>STANDARD</StorageClass>
</Contents>
<Contents>
  <Key>folder_one/folder_two/file_two</Key>
  <LastModified>2014-11-18T14:16:19.000Z</LastModified>
  <ETag>"6e563e7cf3fda1549cb13aeae7a53b24"</ETag>
  <Size>6148</Size>
  <StorageClass>STANDARD</StorageClass>
</Contents>

The problem here is that I supposedly also require entries for the folders themselves, in the example that would be “folder_one/” and “folder_one/folder_two/”. If I don’t have these entries, connected systems like Typo3 won’t recognize, that there are folders. If the entries are missing for the folders on the root level, I even get an exception like this:

HTTP/1.1 404 Not Found x-amz-request-id: XXX x-amz-id-2: XXX Content-Type: application/xml Transfer-Encoding: chunked Date: Tue, 18 Nov 2014 09:10:16 GMT Server: AmazonS3 NoSuchKeyThe specified key does not exist

This is confusing, because when viewing the bucket in the Amazon web interface, it shows the folders while exploring.

After some research I found out that everything in the Amazon S3 buckets is treated as an “object”, files as well es folders. I assume that while uploading or copying to a bucket, the tool being used just copies the objects for the files, but not the objects for the folders. In order to fix this, I wrote a short script in PHP which goes through all objects and adds the missing objects for folders. As an example: Imagine you have an empty bucket and just one file with the object “/folder_one/folder_two/file”. The script will see this path and add the two objects “/folder_one/” and “/folder_one/folder_two/”.

In order to use the script, download the Amazon AWS SDK for PHP here. Prepare a config file, which contains your keys:

<?php
return array(
    'includes' => array('_aws'),
    'services' => array(
        'default_settings' => array(
            'params' => array(
                'key'    => 'YOUR_KEY',
                'secret' => 'YOUR_SECRET_KEY',
                'region' => 'YOUR_REGION',
                'signature'    => 'v4'
            )
        )
    )
);

Note: Fill in your key, secret key and the region. I have to use v4 of the signature, because the bucket I am using is situated in Frankfurt (eu-central-1′). If you use the v2 of the authorization mechanism, just delete the line containing the signature.

The following is the files which contains the logic:

<?php

require 'aws/aws-autoloader.php';
use Aws\Common\Aws;

$aws = Aws::factory('config.php');
$client = $aws->get('s3');

$addObjects = array();

$iterator = $client->getIterator('ListObjects', array('Bucket' => 'YOUR_BUCKET_NAME'));
foreach ($iterator as $object) {
    $path = $object['Key'];

    // only enter the condition, if the path does not end with a slash
    if (substr($path, -1) != "/") {
        // iterate as long as there is a slash in the path
        while (strpos($path, "/") !== FALSE ) {
            $path = substr($path, 0, strrpos($path, "/"));
            if (!in_array($path . "/", $addObjects)) {
                array_push($addObjects, $path . "/");
            }
        }
    }
}

foreach ($addObjects as $object) {
	$params = array(
		'ACL' => 'bucket-owner-full-control',
		'Body' => "",
		'Bucket' => 'YOUR_BUCKET_NAME',
		'Key' => $object
	);
	$client->putObject($params);
}

Be sure to require the autoloader of AWS. We use the factory method of the Aws class and the config file we wrote. The first loop iterates over the object which are available in the bucket. It reads the path of the object and adds all folders, which are a part of the path to the array “$addObjects”. The second loop iterates over the folder paths we just collected and adds objects for them to the bucket. Note: Replace the two occasions of “YOUR_BUCKET_NAME” with the name of the bucket you are using.


Ubuntu 14.04 apache webserver installation – hosting Typo3, Joomla or WordPress

This article is a guideline on how to install and configure an apache webserver, which is ready to  host content management systems like Typo3, Joomla, WordPress or other PHP applications. It also give hints for the installation on an Amazon EC2 instance. I used these instructions for a setup on Amazon EC2.

Starting from a fresh ubuntu installation, install LAMP (Linux – Apache – MySql – PHP).

tasksel install lamp-server

The dialog for installation will open, enter the required information (MySql root user password).

Open the hostname file with the following command and enter the public hostname of the server. In my case it is the hostname of the Amazon EC2 instance.

vim /etc/hostname

Installing PHP modules for the webserver

I have a list of PHP modules, which I frequently require in order to host certain applications and CMS systems. Install them with the following command:

apt-get install imagemagick curl libcurl3 libcurl3-dev php5-curl php5-mcrypt php5-gd php5-json php5-dev php5-xsl

After the installation of the modules I usually change some settings of the php.ini, the settings I change are the following:

  • upload_max_filesize = 100M
  • post_max_size = 100M
  • memory_limit = 128M

You can change the php.ini file using the following command:

vim /etc/php5/apache2/php.ini

It’s not necessary to change the limits like that – if you have other requirements, they won’t affect the installation in any way. The last step is to reload Apache:

/etc/init.d/apache2 reload

Installing FTP services for the webserver

Usually I use FTP services for upload (and to connect IDEs via FTP for easier deployment), so we also install a FTP server, in this case the service is called vsftpd. I can be installed using the following command:

apt-get install vsftpd

After that we alter the configuration file of vsftpd in order to allow ubuntu systems users to connect via FTP using their passwords and to upload/download files via FTP. Change the configuration file using the following command:

vim /etc/vsftpd.conf

Change the following three values:

  • local_enable=YES
  • write_enable=YES
  • local_umask=022

After changing and saving the file, restart the service using the following command:

service vsftpd restart

In case you are using an Amazon EC2 instance like me, make sure to add the ports 20 and 21 as inbound to the security group of your EC2 instance. Also, you have to set the value in the vsftpd configuration file “pasv_enable=YES” and add the following lines:

pasv_enable=YES
pasv_min_port=64000
pasv_max_port=64321
port_enable=YES
pasv_address=<your-publicly-resolvable-host-name>
pasv_addr_resolve=YES

Reload the service vsftpd again. Add the port range 64000-64321 to the EC2 inbound rules. The workflow is also explained on stackoverflow here.

Installing sendmail for email sending on the webserver

In order to send emails from the server (which is mainly used by the content management systems) install sendmail using the following command:

apt-get install sendmail

In order to conduct a test, to see if the email sending is working, install the following package:

apt-get install bsd-mailx

Now you can try to send an email from command line using the following:

mail -s "example subject" email@address.eu

Replace your own email address with “email@address.eu”. After writing this command, an empty line will show in the command line – here you have to write the content of your test email. After clicking one more type Return, write a single dot (“.”) to mark the end of the email. You have the option to add a CC email address, after that the email should be send.

Installing webmin and virtualmin for managing the webserver

In order to administrate the server and the virtual hosts on the server via graphic interface in the browser, I am using webmin and virtualmin. Before starting to install webmin, install some required packages using this command:

aptitude -y install perl libnet-ssleay-perl openssl libauthen-pam-perl libpam-runtime libio-pty-perl apt-show-versions libapt-pkg-perl

Visit the homepage of webmin here and check for the latest version of webmin, in my case it was the version 1.710. Download and install webmin using the following two commands:

wget http://downloads.sourceforge.net/project/webadmin/webmin/1.710/webmin_1.710_all.deb
dpkg -i webmin_1.710_all.deb

After, visit the homepage of virtualmin to check for the latest version, in my case it’s 4.12. Download and install like this:

wget http://download.webmin.com/download/virtualmin/webmin-virtual-server_4.12.gpl_all.deb
dpkg -i webmin-virtual-server_4.12.gpl_all.deb

After installation, remove the two .deb files remaining, they are not required anymore.

Installing apache2-mpm-itk for webmin and virtualmin

After a basic installation, the document root of the webserver is usually residing in /var/ww. This option has some drawbacks, for example that users should just have access to their /home directory and that files in /var/www should be owned by www-data. Virtualmin stores the website data in the home directory and adds an user for every domain. This is a good solution, futhermore you can use vsftpd to limit every user to just their home directory. apache2-mpm-itk takes care, that the files in the home directory can still be owned by the user and apache won’t have any problems with this. Install the module and reload apache:

apt-get install apache2-mpm-itk
service apache2 restart

After the installation, you can usually access webmin using the following address: https://YOUR-DOMAIN:10000. Since I am using an Amazon EC2 instance, I also had to take care of the following things:

  • You have to add a rule to allow access on port 10000. In order to add it, go to the Amazon AWS management console and open the EC2 instances. Scroll to the right and click on the Security Group of the EC2 instance, you want to grant access on port 10000 on. Click the “inbound rules” tab, hit “Edit” and click on “Add rule”. Choose “Custom TCP rule”, choose “TCP” protocol, enter the port “10000”, select for source “Anywhere” and save. Now it should be possible to open the webmin link at https://YOUR-DOMAIN:10000.
  • Another thing is that webmin requires an user and a password to login. When using Amazon EC2 instances, the root user should have a key, not a pass. This means, that we have to add an user for webmin. Use the following command to add the user:
    adduser USERNAME

    Open the following file

    vim /etc/webmin/miniserv.users

    add the following line

    USERNAME:x:0

    and delete the line for the root user. After, open the following file:

    vim /etc/webmin/webmin.acl

    Replace “root” with the username you just added. Restart the webmin service using the following command:

    service webmin restart

    After refreshing the address https://YOUR-DOMAIN:10000, you should now be able to log in.

Configuration Webmin and Virtualmin

After logging in to webmin, go to Webmin – Webmin Configuration and open “Webmin Themes”. Change the Theme to “Blue Framed Theme”. This is the theme working best for me while using virtualmin. Go to “Servers” and click von “Virtualmin Virtual Servers” and start the Post-Installation Wizard. After you made the choices here, click on “Re-check and refresh configuration”. Some problems, depending on your exact configuration might appear, here are the points which I had to change:

  • Deactivate BIND DNS, because I just use the server for hosting the sites, the domains are managed elsewhere and just point to this server.
  • Add virtuser table to sendmail. Open the sendmail menu, click on “Sendmail M4 Configuration” and click “Edit file manually”. Between the lines
    dnl # Default Mailer setup

    and

    MAILER_DEFINITIONS

    paste the following:

    dnl # Masquerading options
    FEATURE(`always_add_domain')dnl
    MASQUERADE_AS(`dev-carrenoir.eu')dnl
    FEATURE(`allmasquerade')dnl
    FEATURE(`masquerade_envelope')dnl
    FEATURE(`virtusertable',`hash -o /etc/mail/virtusertable')

    Save the file and click the button “Rebuild Sendmail Configuration” and “Yes, replace it now” after.

  • Virtualmin needs to have the modules “mod_suexec” and “mod_actions” enabled. Go to “Servers” -> “Apache Webserver” -> “Global configuration” -> “Configure Apache Modules”. Check “suexec” and “actions” and click “Enable Selected Modules”.
  • Virtualmin wants us to remove “SetHandler” lines from the php5 configuration file in “/etc/apache2/mods-enabled/php5.conf”. I don’t like this option a lot – but it is not a big problem. We can add the SetHandler instructions in the template for every virtual host which is going to be created. Edit the php5 configuration file using the following command:
    vim /etc/apache2/mods-enabled/php5.conf

    and comment the two lines starting with “SetHandler”. Reload the webserver after

    service apache2 reload
  • If the suexec command is not found in the system, install the following additional package
    apt-get install apache2-suexec-custom

    The following file

    vim /etc/apache2/suexec/www-data

    has the first line “/var/www”. Replace this with “/home”, save and close the file. Reload apache

    service apache2 reload
  • If webalizer is not installed yet, install it using the command
    apt-get install webalizer

After all problems are removed, Virtualmin should load. Now we have to add some configurations to the template, which is used to create new virtual hosts. Open “Servers” -> “Virtualmin Virtual Servers (GPL)” and open “Server Templates”, choose “Default Settings”. From the dropdown, select “Administration user”. For the point “Add domain owners to secondary group” choose “Selected group” and pick “www-data”. Pick “Apache website” from the same dropdown and paste the following to the end of “Directives and settings for new websites”:

<IfModule mpm_itk_module>
AssignUserId ${USER} ${USER}
</IfModule>
<FilesMatch ".+\.ph(p[345]?|t|tml)$">
    SetHandler application/x-httpd-php
</FilesMatch>
<FilesMatch ".+\.phps$">
    SetHandler application/x-httpd-php-source
    # Deny access to raw php sources by default
    # To re-enable it's recommended to enable access to the files
    # only in specific virtual host or directory
    Order Deny,Allow
    Deny from all
</FilesMatch>

Now you should be all set to add the first virtual server.

OCL in Eclipse EMF and GMF for model validation

The following article explains, how to use OCL constraints on an existing model in order to validate the model, which is created by a graphical editor supplied by GMF. The explanations are based on a simple EMF/GMF project, which is explained here.

Necessary OCL plugins

Install the package “OCL Examples and Editors”:

Install the package OCL Examples and Editors.

Install the package OCL Examples and Editors.

How to use OCL in the project

The project we created in the previous tutorial lets us create simple business processes, including “events” and “processSteps”. Right now there is no order, an event may follow and event and a processStep may follow a processStep. In this example we are going to add constraints, which define, that an event only follows a processStep and a processStep only follows an event.

OCL uses a specific language to define constraints, a good overview may be found here:

The model which is used looks like this:

UML representation of the model.

UML representation of the model.

The ProcessShapes are linked using the Sequences. The Sequences has a target and a source. We need to define constraints, which do the following:

  • if the type on source is Event, the type on target needs to be ProcessStep
  • if the type on source is ProcessStep, the type on target need to be Event

Using the OCL syntax, these statements will look like this:

invariant constraint1: source.oclIsTypeOf(Event) implies target.oclIsTypeOf(ProcessStep);
invariant constraint2: source.oclIsTypeOf(ProcessStep) implies target.oclIsTypeOf(Event);

“oclIsTypeOf” compared the used type, we check the type on the source and the type on the target.

Add OCL to the EMF/GMF project

Right-click the .ecore file in the project. Click on “Open With” and choose “OCLinEcore Editor”.

Open the .ecore file using the OCLinEcore Editor.

Open the .ecore file using the OCLinEcore Editor.

The file should look like this:

package businessprocess : businessprocess = 'http://businessprocess/1.0'
{
	class BusinessProcessModel
	{
		attribute name : String[?] { ordered };
		property shapes : ProcessShape[*] { ordered composes };
	}
	class ProcessStep extends ProcessShape;
	class Event extends ProcessShape;
	class _'Sequence'
	{
		attribute label : String[?] { ordered };
		property target : ProcessShape { ordered };
		property source : ProcessShape { ordered };
	}
	class ProcessShape
	{
		attribute name : String[?] { ordered };
		property sequences : _'Sequence'[?] { ordered composes };
	}
}

We need to add our constraints to the “Sequence class”, the file should look like this after:

package businessprocess : businessprocess = 'http://businessprocess/1.0'
{
	class BusinessProcessModel
	{
		attribute name : String[?] { ordered };
		property shapes : ProcessShape[*] { ordered composes };
	}
	class ProcessStep extends ProcessShape;
	class Event extends ProcessShape;
	class _'Sequence'
	{
		attribute label : String[?] { ordered };
		property target : ProcessShape { ordered };
		property source : ProcessShape { ordered };
		invariant constraint1: source.oclIsTypeOf(Event) implies target.oclIsTypeOf(ProcessStep);
		invariant constraint2: source.oclIsTypeOf(ProcessStep) implies target.oclIsTypeOf(Event);
	}
	class ProcessShape
	{
		attribute name : String[?] { ordered };
		property sequences : _'Sequence'[?] { ordered composes };
	}
}

Save the file and close it. The next step is to open the .genmodel file, right click on the first element in the list and click on “Reload”:

Reload the .genmodel file after applying changes to the .ecore model.

Reload the .genmodel file after applying changes to the .ecore model.

A dialoge will open, during the first step select “Ecore model”, in the second step you need to select the .ecore model we just amended. Clicking on “Finish” will reload the .genmodel. Right-click on the same element again and click “Generate Model Code”:

Generate Model Code after reloading the .genmodel.

Generate Model Code after reloading the .genmodel.

This will create new model code, including the OCL constraints we added. If you already have a .diagram project, delete it now, since we need to recreate it. Open the .gmfgen file of the project, and view the properties of “Gen Diagram BusinessProcessModelEditPart”:

View the properties of "Gen Diagram BusinessProcessModelEditPart".

View the properties of “Gen Diagram BusinessProcessModelEditPart”.

Use the properties to search the group “Diagram” and change the values “Validation Decorators” and “Validation enabled” to “true”.

Set Validation Decorators and Validation Enabled to true.

Set Validation Decorators and Validation Enabled to true.

Save the .gmfgen file, right click the first element and click on “Generate diagram code”.

Generate the new diagram code.

Generate the new diagram code.

Right click the .diagram project and run it as an eclipse application. After the application launched, add a new file and select “Businessprocess Diagram”:

Add a businessprocess diagram file.

Add a businessprocess diagram file.

Click on “Window”, “Show View” and select “Problems”. The problems-view will inform us, if the model violates our OCL-constraints.

Add the problems view to see OCL constraint violations.

Add the problems view to see OCL constraint violations.

After this is done, we can try the validation. Add two events and link them – this is not valid because an Event should be followed by a ProcessStep.

Add an invalid process linking an Event to an Event.

Add an invalid process linking an Event to an Event.

Use the Eclipse menu, click on “Edit”, then on “Validate”:

Validate the business process.

Validate the business process.

After validation, the sequences between the elements will be marked:

Invalid sequence between two Events.

Invalid sequence between two Events.

Furthermore, the problem view informs us, that the current business process violates constraint2:

The problem view informs about the OCL constraint violation.

The problem view informs about the OCL constraint violation.

Eclipse EMF and GMF Tutorial

This is a small tutorial introducing EMF and GMF plugins of Eclipse. EMF is the abbreviation of “Eclipse Modelling Framework”. Using EMF, models may be created and the java code for them is automatically created. Furthermore, EMF gives the possibility to generate code for an editor using the created model. This editor may be launched as an Eclipse application, which uses the defined model and gives the user the possibility to create model instances. GMF extends this functionality: Notation symbols may be matched to model types and associations. Based on the definition of notation symbols and the matching, java code for a graphic editor can be generated. Launching it as an eclipse application, the model instances can now be created as a diagram.

In this tutorial I will give a brief introduction, how to use EMF and GMF. The model will be a very basic business process model, which consists only of events and process steps. The goal will be to have a graphical editor, which may be used to create a business process using events and process steps. Basically this editor will be created without writing a single line of code.

Further reading: Here are the sources, which I used for creating the example. Further information about EMF, GMF and also Ecore can be found on the following pages:

Getting started

First of all we need to use the Eclipse IDE. In the following example I am using the Juno distribution, but other distributions should do fine as well. Install the following plugins:

  • EMF – Eclipse Modeling Framework SDK
  • Graphical Modeling Framework (GMF) Runtime
  • Graphical Modeling Framework (GMF) Tooling
  • Graphical Modeling Framework (GMF) Tooling – Runtime Extensions

Creating the project using EMF and GMF

Creating a new project, choose “Other” and select “Empty EMF Project” in the “Eclipse Modeling Framework” folder.

Add an empty EMF project

Add an empty EMF project

Choose a project name and click "Finish".

Choose a project name and click “Finish”.

Next step is to create an EMF Ecore model. The project, which we just created, contains a folder named “model”. Right-click this folder, and click “New” -> “Other”. Select “Ecore diagram” in the “Ecore Tools” folder.

Add Ecore diagram

Add Ecore diagram

Choose a name, in this case "businessprocess.ecore."

Choose a name, in this case “businessprocess.ecore.”

The model folder should now contain two files: “businessprocess.ecore” and “businessprocess.ecorediag”. On opening the ecorediag file an editor will show, which lets us create the model in a graphical environment.

Let’s create a basic EMF Ecore model, containing the class ProcessShape, which could either be a ProcessStep or an Event. ProcessShapes are connected using a Sequence. In order to create this model, we just need the types “EClass” and the connection “EReference” and “Inheritance”.

Create the EMF Ecore model for the business processes.

After saving, the model will be also updated in the .ecore file, wich should now look like this:

The update .ecore model.

The update EMF .ecore model.

Right-click the model folder of the project, select “New” -> “Other” and choose “EMF Generator Model” in “Eclipse Modeling Framework”:

Add the EMF Generator model.

Add the EMF Generator model.

In the next step, be sure, that the model folder is selected and give a name for the EMF generator model, i.e. “businessprocess.genmodel”.

Select folder and name for the generator model.

Select folder and name for the EMF generator model.

During the next step, we need to choose the model importer, select “Ecore model”.

Select the model importer for the generator model.

Select the model importer for the generator model.

After, we need to select the EMF .ecore model which we created. Click “Browse Workspace” and select “businessprocess.ecore” in the project we created:

Select the ecore model for the generator model creation.

Select the ecore model for the generator model creation.

Now you just need to hit “Load”, go to the next step and click “Finish”. The file “businessprocess.genmodel” should now be created and reside in the “model” folder of the project. The .genmodel file will look similar to the .ecore file:

The genmodel file of the project.

The genmodel file of the project.

We need to set the base package,select the first entity “Businessprocess” and open the Properties view. If it is not opened already, open it using right-click on “Businessprocess” and clicking “Show Properties View”. The basepackage needs to be set to the project name and the folder, in which the model resides. In my case, the name of the project is “com.meberhard.me” and the folder “model”, so the name of the base package is “com.meberhard.me.model”.

Properties view of the genmodel.

Properties view of the genmodel.

Now everything is set to generate the model and the edit code. Right click on top element “Businessprocess” in the .genmodel file and click “Generate Model Code”, do the same again and click “Generate Edit Code”.

Generate the model and the edit code.

Generate the model and the edit code.

If this step went well, you should now one new project in the workspace, ending on .edit, additionally the model code should be created in the “src” folder of your base project.

Now we may start with the graphical part, defining the notation symbols and map them to the model. In the eclipse menu, click on “Window” -> “Show View” -> “Other”. Select “GMF Dashboard” inside the “General” folder. The following view should open:

The GMF dashboard.

The GMF dashboard.

We start from “Domain Gen Model” – click on “Select” and choose the .genmodel file, which we created. After, click on “Select” in “Domain Model” and choose the EMF .ecore file, which we created. After that, click “Create” inside “Graphical Def Model”. Select again the “model” folder in the opening view and set the name to “businessprocess.gmfgraph”.

Creation of the GMFGraph model.

Creation of the GMFGraph model.

A new file will open, which contains an element in a list view, called “Canvas”. Right-click on “Canvas” and add a “Figure Gallery”:

Adding a Figure Gallery in GMFGraph.

Adding a Figure Gallery in GMFGraph.

Right click the created “Figure Gallery” and add three times “Figure Descriptor”. Use the properties of the first one and give it the name “Rectangle”, use the properties of the second one and give it the name “Ellipse” and the properties of the last one to call it “Connection”. Right-Click the first “Figure Descriptor”, select “Add Child” and add the Rectangle. Right-Click the second “Figure Descriptor”, select “Add Child” and add the Ellipse. Right-click again the “Figure Gallery” and add a “Polyline Decoration”. Use the properties to call it “connection decoration”. Right-click the “Polyline Decoration” and add a “Polygon”. Right-click the “Figure Descriptor Connection” and add a “Polyline Connection”. Use the properties to set the name to “sequence” and the “Target Decoration” to “Polyline Decoration connection decoration”. After being successful, the .gmfgraph file should look like this:

Updated gmfgpraph file, containing the Figure Gallery.

Right-Click again on the “Canvas” element and insert two children of the type “Node”. Use the properties of the first Node to give it the name “event”, in the dropdown next to “Figure” choose the “Figure Descriptor Rectangle”. Give the second Node the name “processStep” and choose the Figure “Figure Descriptor Ellipse”. This means, that events will be represented by Ellipses and processSteps by Rectangles.

Right-Click on “Canvas” and add a child “Connection”. Use the properties to give it the name “sequence” and set “Figure” to “Figure Descriptor Connection”. Use right-click on “Canvas” to add three times “Diagram Label”. Using the properties, the first Label should get the name “eventName”, the second label “processStepName” and the last label “sequenceLabel”. The GMFGraph model should now look like this:

Complete GMFGprah model.

Going back to the GMF Dashboard, click on “Create” in “Tooling Def Model”. In the opening view, select the “model” folder and give it the name “businessprocess.gmftool”.

Creating the GMF tooling file.

Creating the GMF tooling file.

The created file will already contain an element “Tool Registry” in a list view. Right-click the “Tool Registry” and add a child “Palette”. Right click the “Palette” and add three children “Creation Tool”. Use the properties, set the title of the first “Creation Tool” to “event”, the title of the second “Creation Tool” to “processStep” and the title of the third to “sequence”. The file should look like this:

Creation of the GMF tooling file.

Right-Click the “model” folder of the project, select “New” -> “Other” and choose “Guide Mapping Model Creation” in the opening view, it is inside the folder “Graphical Modeling Framework”.

Add the Guide Mapping Model Creation to the model folder of the project.

Add the Guide Mapping Model Creation to the model folder of the project.

Make sure, that the folder “model” is selected and choose the name “Creation of the GMF tooling file”.

Adding the file gmfmap to the project.

Adding the file gmfmap to the project.

Leave the next view like it his and click “Next”, the view should look like this:

The Select Domain Model model view while creating the GMFMap model.

The Select Domain Model model view while creating the GMFMap model.

Leave the following two views also like they are. The last view shows the mapping and should look like this:

The mapping when creating the GMFMap file.

Click on the right side on “Sequence (sequence; sequences)” and click the button “Change”. Set the “Source Feature” to “EReference source” in the opening dialogue.

Set the source feature to ERference source.

Set the source feature to ERference source.

Click “Finish” to create the file and open it. We need to make some manual amendments, i.e. adding the labels and fixing the mapping from processStep to Ellipse (because now both event and processStep are assigned to Rectangle).

Choose the mapping, which contains “Top Node Reference <shapes:ProcessStep/event>”. Open all children and open the properties of “Node Mapping <ProcessStep/event>”.

Altering the properties of the GMFMap model.

Altering the properties of the GMFMap model.

In the properties, change “Diagram Node” from “Node event (Rectangle)” to “Node processStep (Ellipse)”.

Altering mapping properties.

Altering mapping properties.

After, select the “Feature Label” of the three mappings and assign the processStepName label to the processStep, the eventName label to the event and the sequenceLabel to the sequence.

Example of the Diagram Label assignment.

Example of the Diagram Label assignment.

After this is done, right click on the first element of the list and click on “Create generator model”.

Create the generator model.

Create the generator model.

In the following view, be sure that the “model” folder is selected and choose the name “businessprocess.gmfgen”.

Create the generator model .

Create the generator model.

Don’t change nothing in the following views, click next until you are able to click Finish. After clicking “Finish”, the file “businessprocess.gmfgen” should be available in the “model” folder. Open the file, right-click the first element and click “Generate Diagram Code”.

Generate the diagram code from the gmfgen file.

Generate the diagram code from the gmfgen file.

Your workspace should now contain a new project ending in “.diagram”. Right-click the project and click on “Run as” and choose “Eclipse application”.

Run the .diagram project as eclipse application.

Run the .diagram project as eclipse application.

After the new eclipse instance opened, click the “New” icon and search for “Businessprocess Diagram” in the “Examples” folder.

Add a new businessprocess diagram.

Add a new businessprocess diagram.

Now you are able to create a very basic process diagram, which consists of events and processSteps. You can use “sequence” in the “palette” to connect single symbols.

Create a basic process.