The following article gives a brief overview of a strategy used for Typo3 hosting and deployment using Amazon Web-Services (AWS,) and the methods used to continuously deploy new versions of the system.
AWS components usage
Assuming that the setup uses development, staging and live environments. The following picture shows the setup of the development instances. Every developer could use an own EC2 instance, a RDS database and a S3 bucket. AWS offers the “micro” plan, so these instances should not cause a lot of costs. The developer environment can be easily replicated by copying the EC2, RDS and S3 components.
 The image illustrates, that every developer can work on their own instance while sharing the sources on SVN. The SVN structure is rather easy for such a project. The following two folders are sufficient:
- configuration: Stores all configuration files like “LocalConfiguration.php” or real_url configuration files
- extensions: Stores all extbase extensions which contain the functionality of the system
Note that you can use an extension also for storing all templates, css and javascript files. This way, the fileadmin is obsolete for storing such information and can be excluded completely from SVN. In such a project, the fileadmin is used solely for media files like images and videos and resides in the cloud as a S3 bucket.
Use S3 bucket for storing media files
In order to connect the Typo3 system to a S3 bucket, the following extension can be used, click here. After installing, a new storage can be added in the backend clicking on “List” and after on the first item of the list. Locate the list “File Storage” and add a new one. Give it a name and switch to the “Configuration” tab. From the “Driver” dropdown, choose “Amazon S3” and fill out the required information concerning the bucket you are using. If you want to only host media files in the cloud, you can even deactivate the preset “fileadmin” file storage and make the other one the default one. After refreshing the backend, a click on “Filelist” should now display all files of the bucket. Note: If you transition from local fileadmin use to bucket use, you can just copy all files from fileadmin to the bucket, add the file storage for the bucket and remove the fileadmin file storage. File references are kept after, instead of serving files locally Typo3 should now serve them from the bucket.
Additional note: Sometimes, when copying or uploading files to the bucket, it does not add keys, so the Typo3 backend might throw an Exception like “NoSuchKey Exception”. Follow the solution explained here in such a case.
Stage and live environment
In this setup the stage environment is used to test new functionality and to add content. Since there is no requirement for handling load, the stage environment is exactly the same like a dev environment, having an EC2 instance, S3 bucket and a RDS database. The live environment contains an EC2 instance including load balancer, two S3 buckets and two RDS databases. The following image illustrates this:
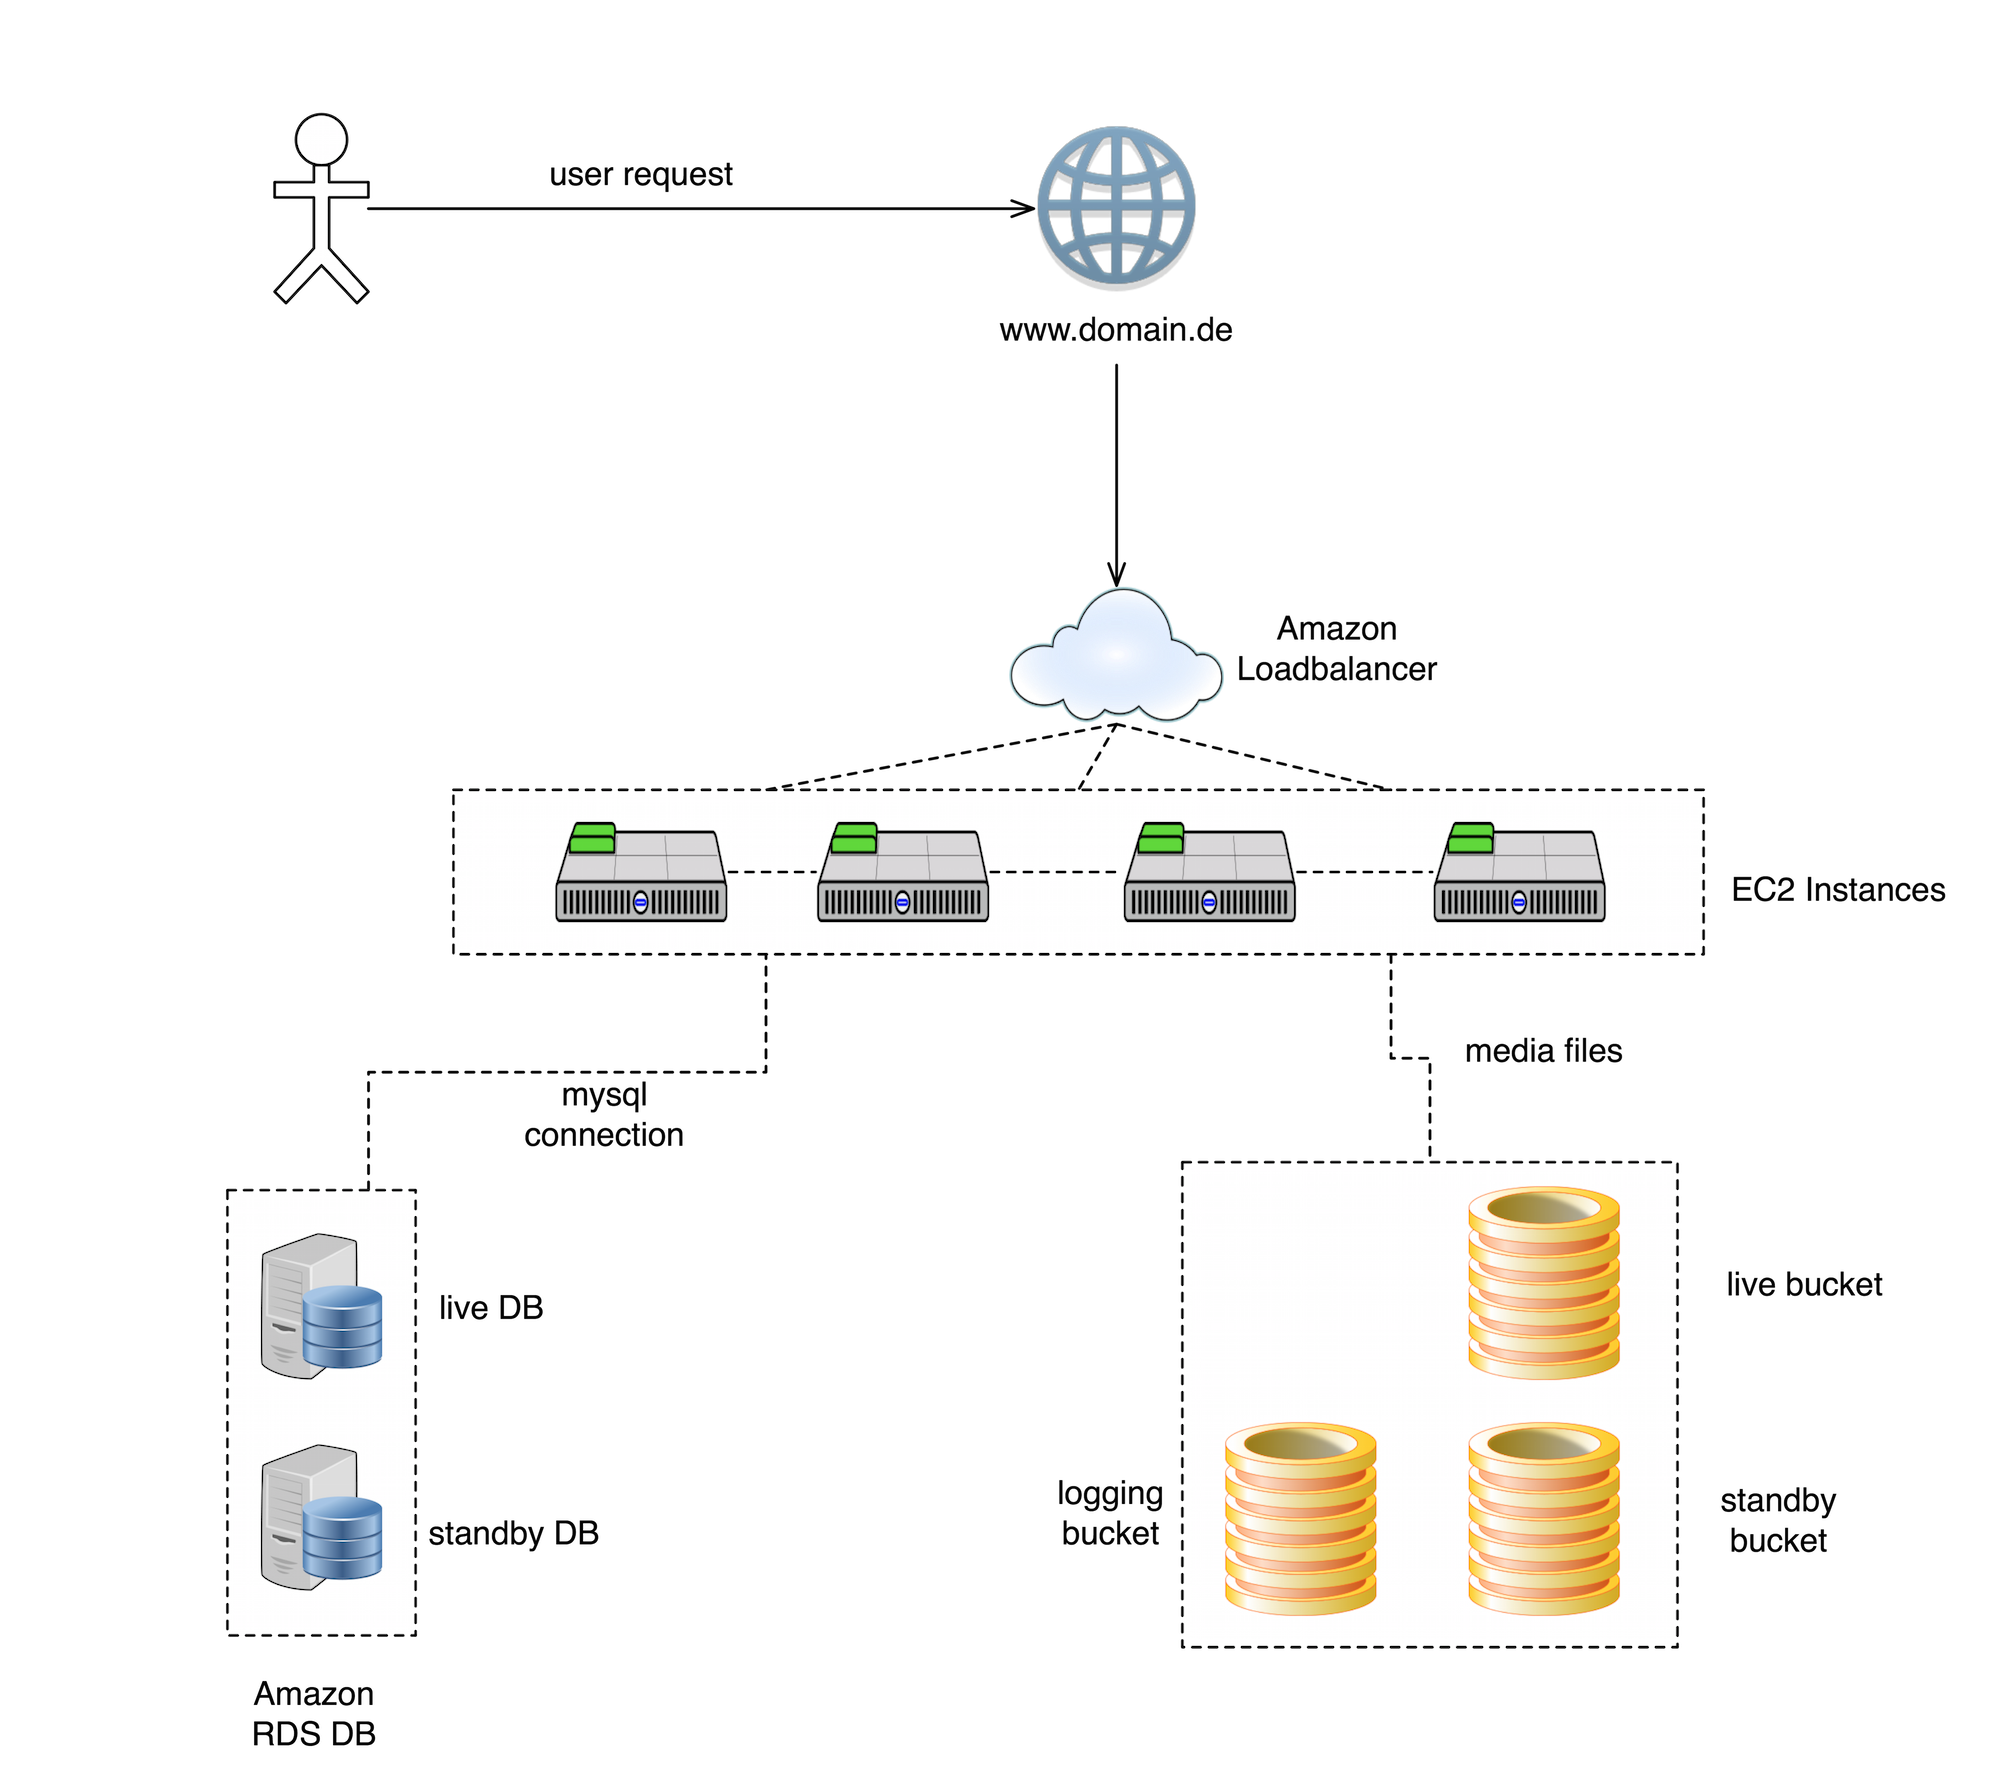
The user requests the domain via browser, the Amazon load balancer assign an EC2 instance. The section called “Deployment procedure for live” explains the necessity of having two live DBs and two live buckets.
Deployment procedure for stage
The deployment should work in a mostly automatic way, therefore SVN branches and a deployment tool like phing can be used. Note, that this works also with other source code versioning and deployment tools. Here is an example phing script, which is used for deployment:
<?xml version="1.0" encoding="UTF-8"?>
<project name="project-name" default="dist">

    <target name="dist" description="The build file used to deploy on staging.">

        <fail unless="svnversion" message="Property 'svnversion' not defined." />

        <!-- Export the latest SVN branch -->
        <echo message="Checking out the SVN branch..." />
        <svnexport
                repositoryurl="svn://svn-domain/project-name/branches/${svnversion}"
                force="true"
                username="user"
                password="pass"
                nocache="true"
                todir="/local-path/phing/project-name"
                >
        </svnexport>

        <!-- Deploy the configuration files -->
        <echo message="Deploying configuration files on staging..." />
        <ftpdeploy
                host="host"
                port="port"
                username="user"
                password="pass"
                dir="/server-dir/public_html/typo3conf">
            <fileset dir="/local-path/phing/project-name/configuration">
                <include name="AdditionalConfiguration.php"/>
                <include name="LocalConfiguration.php" />
            </fileset>
        </ftpdeploy>

        <!-- Deploy the plugins -->
        <echo message="Deploying the plugins on staging..." />
        <ftpdeploy
                host="host"
                port="port"
                username="user"
                password="pass"
                dir="/server-dir/public_html/typo3conf/ext"
                depends="true">
            <fileset dir="/local-path/phing/project-name/extensions">
                <include name="tx_extension_1/**"/>
                <include name="tx_extension_2/**" />
                <include name="tx_extension_3/**" />
                <exclude name="tx_extension_1/Configuration/TypoScript/domainspecific.txt" />
            </fileset>
        </ftpdeploy>

        <!-- Clear cache on staging -->
        <echo message="Clear cache on staging..." />
        <exec command="sh /local-path/phing/helpers/clearcache.sh" />
        <echo message="Cache cleared on staging." />

        <!-- Clean up after the deploy, delete the contents of project-name -->
        <echo message="Deleting the SVN export directory..." />
        <delete dir="/local-path/phing/project-name" verbose="true" includeemptydirs="true">
        </delete>

        <mail from="deploy@your-server.com" message="Deployed version ${svnversion} on domain.com"
              subject="Deployed successfully version ${svnversion} on domain.com"
              tolist="email1@email.com,email2@ email.com">
            Build process successful.
        </mail>

        <echo message="Deploy done." />

    </target>

</project>
Explanations about this build script: Line 6 causes the build script to fail, if the user didn’t specify the svnversion, that should be deployed. Usually, the phing build script can be called on command line by using the command “phing” while being in the directory, where the file build.xml resides. Additionally for this script the user should specify the svnversion, so the command could look like this “phing -Dsvnversion=Project_v1.15”, if there is a SVN branch called “Project_v1.15”. “svnexport” starting on line 10 exports the specified SVN branch and saves the files locally. “ftpdeploy” starting from line 22 loads the configuration files to the staging server. Like specified above, the SVN has two folders:
- configuration
- extensions
The “ftpdeploy” instructions deploy the configuration files directly to the folder “typo3conf” on the staging server. In “fileset” starting from line 28 all files need to be included, which should be deployed. The “ftpdeploy” instructions starting from line 36 deploy the plugins to “typ3conf/ext” on the staging server. Include the plugin folders within “fileset”, the wildcard as seen in “tx_extension_1/**” will include all subfolders and files recursively. The “exclude” instruction can be used to exclude files which contain domainspecific information, because staging, development and live environments probably use different domains. After deploying configuration and plugin files, an additional script is called which clears the cache on the staging server. The content of the shell script looks like this:
ssh -i AWSkey.pem ubuntu@public-EC2-name.compute.amazonaws.com << EOF
    sudo -s
    cd /path-to-typo3system/
    ./typo3/cli_dispatch.phpsh extbase cacheapi:clearallexceptpagecache
    exit
    exit
EOF
This script logins via shell to the EC2 instance and uses the Typo3-cli to clear the cache. Note: “cacheapi” is not included in the basic typo3 installation. You will need to install the additional plugin called “extcoreapi”, which will add such functionality. This extension can be found here.
Deployment procedure for live
Like stated above, the live instance has two database and two buckets. In the public_html folder, you can add a new folder, called “deployment” and inside this folder two subfolders which are called “deployment_1” and “deployment_2”. These folders can contain the SVN export, in our case the folders “configuration”, containing configuration files and “extensions”, containing Typo3 extensions. Every time the deployment mechanism should switch the deployment folder: First time the deploy is started, it will export the SVN branch to “deployment_1”, the second time it will export to “deployment_2” and the third time again to “deployment_1”, etc. We use symlinks, to create links for configuration files in typo3conf/ and for the extensions in typo3conf/ext. This procedure has the benefit of exchanging the symlinks very fast, if a deploy didn’t work and crashes the system. Imagine, you just deployed and the folder “deployment_2” was used, so deployment_2 is also used for the symlinks. If Something doesn’t work, just switch the symlinks back to “deployment_1” in order to rollback to the last working version.
Additionally, we use two databases and two buckets. In my case, I created an additional configuration file which is called “LocalConfiguration_DB.php”. This configuration files exists both in “deployment_1” and “deployment_2”. The configuration file in “deployment_1” contains the database information for the first database, the configuration file in “deployment_2” contains database information for the second database. Additionally, the first database contains the connection information for the first bucket and the second database contains the connection information for the second bucket. Every time, when the folder “deployment_1” is used for deploying, it will automatically connect to the first database and to the first bucket. When using “deployment_2”, it will use the second database and the second bucket.
Here is a sample phing build script, which updates the live bucket, database and filesystem from the stage server. Before viewing the build script, note that I use additionally the following three properties files:
- bucket.properties, the file contains “lastDeployedBucket=bucketName1”
- database.properties, the file contains “lastDeployedDatabase=typo3db1”
- filesystem.properties, the file contains “lastDeployedFilesystem=deployment_1”
The files store the last used bucket, database and filesystem, so the phing script chooses the other filesystem, database and bucket for the consecutive deploy.
<?xml version="1.0" encoding="UTF-8"?>
<project name="project-name" default="dist">
<target name="dist" description="The build file used to deploy on live.">
<fail unless="svnversion" message="Property 'svnversion' not defined." />
<!-- Checking the last deployed bucket, database and filesystem
It is very important, that the numbers of all items are the same.
It should be for example
typo3db1
bucketName1
deployment_1
OR
typo3db2
bucketName2
deployment_2
in the same time. A mix is not allowed and will stop the build.
-->
<property file="/path-to-folder/helpers/bucket.properties" />
<property file="/path-to-folder/helpers/database.properties" />
<property file="/path-to-folder/helpers/filesystem.properties" />
<if>
<and>
<equals arg1="${lastDeployedDatabase}" arg2="typo3db1" />
<equals arg1="${lastDeployedBucket}" arg2="bucketName1" />
<equals arg1="${lastDeployedFilesystem}" arg2="deployment_1" />
</and>
<then>
<property name="deployDatabase" value="typo3db2" override="false" />
<property name="deployBucket" value="bucketName2" override="false" />
<property name="deployFilesystem" value="deployment_2" override="false" />
</then>
<elseif>
<and>
<equals arg1="${lastDeployedDatabase}" arg2="typo3db2" />
<equals arg1="${lastDeployedBucket}" arg2="bucketName2" />
<equals arg1="${lastDeployedFilesystem}" arg2="deployment_2" />
</and>
<then>
<property name="deployDatabase" value="typo3db" override="false" />
<property name="deployBucket" value="bucketName1" override="false" />
<property name="deployFilesystem" value="deployment_1" override="false" />
</then>
</elseif>
<else>
<fail message="Bucket, Database and Filesystem got mixed up in a previous deploy. Please fix this manually before trying to deploy automatically again." />
</else>
</if>
<fail unless="deployDatabase" message="Property 'deployDatabase' not defined." />
<fail unless="deployBucket" message="Property 'deployBucket' not defined." />
<fail unless="deployFilesystem" message="Property 'deployFilesystem' not defined." />
<!-- Export the latest SVN branch -->
<echo message="Checking out the SVN branch..." />
<svnexport
repositoryurl="svn://svn-domain/project-name/branches/${svnversion}"
force="true"
username="user"
password="pass"
nocache="true"
todir="/local-path/phing/project-name-live"
>
</svnexport>
<!-- Deploy the configuration files -->
<echo message="Deploying configuration files on live..." />
<ftpdeploy
host="host"
port="port"
username="user"
password="pass"
dir="/server-dir/public_html/deployment/${deployFilesystem}/configuration">
<fileset dir="/local-path/phing/project-name-live/configuration">
<include name="AdditionalConfiguration.php"/>
<include name="LocalConfiguration.php" />
</fileset>
</ftpdeploy>
<!-- Deploy the plugins -->
<echo message="Deploying the plugins on live..." />
<ftpdeploy
host="host"
port="port"
username="user"
password="pass"
dir="/server-dir/public_html/00deployment/${deployFilesystem}/extensions"
depends="true">
<fileset dir="/local-path/phing/project-name-live/extensions">
<include name="tx_extension_1/**"/>
<include name="tx_extension_2/**" />
<include name="tx_extension_3/**" />
<exclude name="tx_extension_1/Configuration/TypoScript/domainspecific.txt" />
</fileset>
</ftpdeploy>
<!-- Run content update on database -->
<echo message="Starting to export content from staging..." />
<exec command="mysqldump -uUSER -pPASS -hHOST typo3db --tables pages pages_language_overlay sys_file sys_filemounts sys_file_collection sys_file_metadata sys_file_processedfile sys_file_reference sys_language sys_refindex sys_registry sys_template tt_content tx_dce_dcefield_sectionfields_mm tx_dce_dce_dcefield_mm tx_dce_domain_model_dce tx_dce_domain_model_dcefield tx_l10nmgr_cfg tx_l10nmgr_exportdata tx_l10nmgr_index tx_l10nmgr_priorities tx_extension_table1 tx_extension_table2 > /local-path/phing/project-name-live/export.sql" />
<echo message="Importing content to live database ${deployDatabase} ..." />
<exec command="mysql -uUSER -pPASS -hHOST ${deployDatabase} < /local-path/phing/project-name-live/export.sql" />
<echo message="Content update on database done." />
<!-- Synchronize the S3 bucket -->
<echo message="Starting to synchronize the S3 bucket ${deployBucket} ..." />
<exec command="aws s3 sync s3://bucketStage s3://${deployBucket} --delete --recursive --acl bucket-owner-full-control" />
<echo message="S3 Synchronize done." />
<!-- Clean up after the deploy, delete the contents of folder /local-path/phing/project-name-live -->
<echo message="Deleting the SVN export directory..." />
<delete dir="/local-path/phing/project-name-live" verbose="true" includeemptydirs="true">
</delete>
<!-- Creating symlinks for the deployed filesystem and database.
Please note, that the "typo3db1" is wired to bucket "bucketName1" and
"typo3db2" is wired to bucket "bucketName2" -->
<echo message="Creating Symlinks for the deployed version and database" />
<exec command="sh /local-path/phing/helpers/updatesymlinks.sh ${deployFilesystem}" />
<echo message="Created the symlinks." />
<!-- Now we will change the content of the property files -->
<echo message="Starting to update the properties files" />
<exec command="> /local-path/phing/helpers/bucket.properties" />
<exec command="echo "lastDeployedBucket=${deployBucket}"> /local-path/phing/helpers/bucket.properties" />
<exec command="> /local-path/phing/helpers/database.properties" />
<exec command="echo "lastDeployedDatabase=${deployDatabase}"> /local-path/phing/helpers/database.properties" />
<exec command="> /local-path/phing/helpers/filesystem.properties" />
<exec command="echo "lastDeployedFilesystem=${deployFilesystem}"> /local-path/phing/helpers/filesystem.properties" />
<echo message="Updated the properties files" />
<mail from="deploy@your-domain.com" message="Deployed version ${svnversion} on domain-name.com"
subject="Deployed successfully version ${svnversion} on domain-name.com"
tolist="email1@email.com, email2@email.com">
Build process successful.
Currently used filesystem: /server-dir/public_html/deployment/${deployFilesystem}
Currently used bucket: ${deployBucket}
Currently used database: ${deployDatabase}
In order to rollback to the previous version, ssh to your-domain.com and execute the following command:
sh /local-path/phing/helpers/updatesymlinks.sh ${lastDeployedFilesystem}
</mail>
<echo message="Deploy done." />
</target>
</project>
Line 22, 23 and 24 read the property files. Line 26 to 54 checks the defined properties of the property files. If the previous deploy used filesytem_1, bucketName1 and typo3db1, it will set the properties to deploy this time to filesytem_2, bucketName2 and typo3db2 and vice versa. The script fails, if these properties are not set or mixed up. After, from line 61 to 101 works similar to the stage-deploy script. First, it exports the SVN branch. After, it will upload the files to the live server, but it uses the folders “public_html/deployment/deployment_1” and “public_html/deployment/deployment_2” instead of deploying directly to “typo3conf” and “typo3conf/ext”. The lines 104 to 108 export certain tables from the stage database server, you can define here the tables which contain content. After, it imports those tables to the live server. Line 110 to 113 update the live-bucket according to the content of the stage-bucket. 115 to 118 delete the local SVN branch export, because it’s not further required. 120 to 125 execute a script which updates the symlinks, the script accepts “deployment_1” or “deployment_2” as argument.
if [ "$1" != "deployment_1" -a "$1" != "deployment_2" ]; then
    echo "The first argument needs to be either deployment_1 or deployment_2"
    exit
fi

ssh -i ~/AWSKey.pem ubuntu@AWSHOST.com << EOF
    sudo -s

    rm /home/USERNAME/public_html/typo3conf/AdditionalConfiguration.php
    ln -s /home/USERNAME/public_html/deployment/$1/configuration/AdditionalConfiguration.php /home/USERNAME/public_html/typo3conf/AdditionalConfiguration.php
    chown -h USERNAME:USERGROUP /home/USERNAME/public_html/typo3conf/AdditionalConfiguration.php

    rm /home/USERNAME/public_html/typo3conf/LocalConfiguration.php
    ln -s /home/USERNAME/public_html/deployment/$1/configuration/LocalConfiguration.php /home/USERNAME/public_html/typo3conf/LocalConfiguration.php
    chown -h USERNAME:USERGROUP /home/USERNAME/public_html/typo3conf/LocalConfiguration.php

    rm /home/USERNAME/public_html/typo3conf/ext/tx_extension_1
    ln -s /home/USERNAME/public_html/deployment/$1/extensions/tx_extension_1 /home/USERNAME/public_html/typo3conf/ext/tx_extension_1
    chown -h USERNAME:USERGROUP /home/USERNAME/public_html/typo3conf/ext/tx_extension_1

    rm /home/USERNAME/public_html/typo3conf/ext/tx_extension_2
    ln -s /home/USERNAME/public_html/deployment/$1/extensions/tx_extension_2 /home/USERNAME/public_html/typo3conf/ext/tx_extension_2
    chown -h USERNAME:USERGROUP /home/USERNAME/public_html/typo3conf/ext/tx_extension_2

    rm /home/USERNAME/public_html/typo3conf/ext/tx_extension_3
    ln -s /home/USERNAME/public_html/deployment/$1/extensions/tx_extension_3 /home/USERNAME/public_html/typo3conf/ext/tx_extension_3
    chown -h USERNAME:USERGROUP /home/USERNAME/public_html/typo3conf/ext/tx_extension_3

    cd /home/USERNAME/public_html/
    ./typo3/cli_dispatch.phpsh extbase cacheapi:clearallexceptpagecache
EOF
This shell script removes previous symlinks and adds symlinks for the used deployment folder, either “deployment_1” or “deployment_2”. After setting the symlinks, it calls the Typo3 CLI to delete all caches except the page-cache. Back to the phing script: Linke 128 to 135 updates the property files and writes the used filesystem, bucket and database to them, so the next time you call the deployment, the filesystem, bucket and database are switched accordingly. Line 137 to 148 sends an email and also informs inside the email, that the user can call the shell script to revert to the previous used filesystem, bucket and database in case something went wrong while deploying.