Category Archives: Uncategorized

Use node.js and bower in the IntelliJ IDEA IDE

Here are some clues, how to use node.js and bower in the jIDEA IDE. I need to use it for managing packages in a project for my bachelor thesis. There I use the set up to manage libraries like angularjs, bootstrap and lawnchair.

Nodejs installlation and plugin support in jIDEA

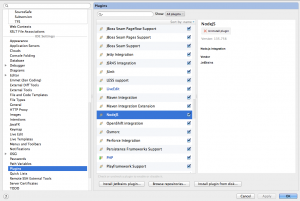
First of all, install node.js – the installer files are provided from their homepage. After that, open jIDEA and go to the settings (IDE Settings -> Plugins) and make sure that “NodeJS” is installed – if not, install it from here:

Install the NodeJS plugin from the settings.

Install the NodeJS plugin from the settings.

Install bower

In my case (Mac OS 10.9.2), node.js was installed to /user/local/bin. Install bower globally by running the following in command line:

/user/local/bin/npm install -g bower

You will maybe require admin/sudo rights to run this command! The output in the command line will show, if the installation was successful.

Use bower package manager in a project

Assuming you already added the project in jIDEA, use the command line and cd the project directory. Simply run

bower init

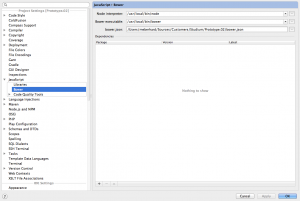
some questions need to be answered on the command line – after that the bower.json file will be added to the project root. Now you can go back to the IDE and open the settings (Project Settings -> JavaScript -> Bower). Fill out the three required fields “Node interpreter”, “Bower executable” and “bower.json”.

Make the settings for bower in jIDEA.

Make the settings for bower in jIDEA.

Add packages with bower

Since bower is set up for the project, you can easily add packages. From the projects settings you may click the plus, to add a package. After clicking the plus, another window will open showing all the available packages. A great benefit is also the dependency management – if you install a package which depends on another package – the dependency will be installed automatically.

Workaround: Twitter application write access when mobile number is not accepted from the Twitter website

I recently added a Twitter application and I needed it to have write access, so it can use the service to follow users on Twitter. This service requires the application to have write access so I just tried switching to write access from the backend. This changed requires having the mobile number saved in the Twitter account. Since I am living in Bulgaria and my current carrier is Globul, I was not able to add the phone number – I got the message:

Sorry, we don’t have a connection to your mobile provider yet!
Don’t worry, we’re on it and will let you know once things are set up. In the meantime, use one of our long codes. Learn more (https://support.twitter.com/articles/14226-how-to-find-your-twitter-short-code-or-long-code)

There doesn’t seem to be a way to work around this. Several users are talking about that in the forum, another user blogs about it here.

Anyway, there is a workaround for that problem. In order to use this workaround, you need to have a smart phone and install the Twitter mobile application. This workaround works for me in iOS – it also seems to work in Android like people report in the Twitter forum. Like this you will be able to switch to Twitter application write access, although the Twitter websites doesn’t accept your phone number.

After installing the Twitter mobile application, go to the tab on the right, it’s the screen showing your user details. Hit the wheel (it’s shown under the amount of tweets) and click “Settings”.

User screen of the Twitter mobile application

User screen of the Twitter mobile application.

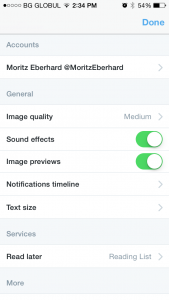
After clicking on “Settings”, another view opens where you have to click on your account.

This view shows the settings of your account in the Twitter application.

This view shows the settings of your account in the Twitter application.

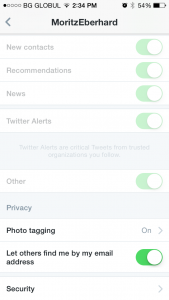
The following view shows the options for your Account – scroll all the way down and click “Security”.

This view shows the account options, on the bottom you can find "Security".

This view shows the account options, on the bottom you can find “Security”.

After hitting the Security option, the application will ask you to add a phone:

This view opens after selecting Security when no phone number was added yet.

This view opens after selecting Security when no phone number was added yet.

After clicking “Add phone”, the mobile browser will open and require you to insert your phone number:

Here you have to insert your phone number and press save.

Here you have to insert your phone number and press save.

After adding the phone number and pressing save, wait a few minutes. Twitter will send you a link to the phone number you just added to verify it. After clicking the link in the SMS the phone number is approved and you should be able to switch the application access to “write”.

Use htaccess to put a site in maintenance mode

The following article explains, how to use the htaccess file in order to put a site or a part of the site in maintenance mode. I use to find myself in the position, where I need to put a site, or a part of a site, in maintenance mode to do changes on a productive server. This usually requires to block the whole site or certain parts and allow only my IP address, or several IP address of people working on the server to be allowed. On the one hand, this could be achieved via the Apache (v)host configuration. It is also possible to do it via the htaccess file, most of the times access is given. Furthermore, changing the htaccess file doesn’t require a restart of the web server afterwards.

If I want to block access to the whole site, I usually use the following htaccess configuration:

RewriteEngine on
RewriteCond %{REQUEST_URI} !/maintenance.php
RewriteCond %{REMOTE_ADDR} !=111.111.111.111
RewriteRule ^.*$ /maintenance.php [R=302,L]

The rules are rather easy: The first RewriteCond checks, if something else than maintenance.php is requested. The second RewriteCond checks, if the IP address is anything else than 111.111.111.111 (my IP address, but changed).  So: If the user is not me and requested something else than maintenance.php, he will be redirected to maintenance.php. There I usually output a message, that the site is currently under maintenance.

If just a certain part of the site needs to be blocked, for example “/forum”, the first RewriteCond of the htaccess file can be changed accordingly:

Options +FollowSymlinks
RewriteEngine on
RewriteCond %{REQUEST_URI} /forum
RewriteCond %{REMOTE_ADDR} !=111.111.111.111
RewriteRule ^.*$ /maintenance.php [R=302,L]

This will block the /forum and any subfolder for every IP except 111.111.111.111. I recommend using R=302 (temporarily moved) instead of R=301 (permanent) redirect, because browsers tend to cache rewrite rules which are defined as R=301. This may cause persistent redirects to maintenance.php, also if the maintenance work is finished and the rules are removed/commented again.

It is also possible to include several IP addresses:

RewriteEngine on
RewriteCond %{REQUEST_URI} !/maintenance.php
RewriteCond %{REMOTE_ADDR} !=111.111.111.111
RewriteCond %{REMOTE_ADDR} !=222.222.222.222
RewriteCond %{REMOTE_ADDR} !=333.333.333.333
RewriteRule ^.*$ /maintenance.php [R=302,L]

More information about htaccess and mod-rewrite can be found on the Apache homepage.

stackoverflow plugin for wordpress (stackoverflow+)

Recently I wanted to display my stackoverflow account details on my blog – I found the plugin stackoverflow+ which I liked from the screenshots. After installing, it didn’t work. The widget itself displayed, but all the fields it should receive from stackoverflow stayed empty. After viewing the sources I noticed that my hosting didn’t provide zlib, so I implemented and alternative implementation to use curl, in case zlib is not available. The file wsp-functions.php will now look like this:

<?php

function sanitizeObject($d)
{
    if (is_object($d)) {
        $d = get_object_vars($d);
    }
    if (is_array($d)) {
        return array_map(__FUNCTION__, $d);
    } else {
        return $d;
    }
}

/**
 * Uses the Stackoverflow API to get certain data
 *
 * @param string $ids
 * @param string $type
 * @return array|mixed
 */
function getUserData($ids, $type = '')
{
    // Define Local Variables
    $site = 'stackoverflow';
    $baseurl = 'http://api.stackexchange.com/2.2/users/';
    $apikey = 'sbI47iM9fyMqLqD0sA2T8A((';

    //Construct Url and Get Data off SO and use Sanitizer.
    if ($type == '') {
        $url = $baseurl . $ids . '?key=' . $apikey . '&site=' . $site . '&order=desc&sort=reputation&filter=default';
    } else if ($type == 'byQuestionids') {
        $url = 'http://api.stackexchange.com/2.2/questions/' . $ids . '?key=' . $apikey . '&site=' . $site . '&order=desc&sort=activity';
    } else {
        $url = $baseurl . $ids . '/' . $type . '?key=' . $apikey . '&site=' . $site . '&order=desc&sort=activity&filter=default';
    }
    if (function_exists('curl_version') === true)
        $results = json_decode(getJsonFromUrl_curl($url));
    else
        $results = json_decode(getJsonFromUrl_zlib($url));
    $results = sanitizeObject($results);
    return $results;
}

/**
 * Gets the json data from the given URL (curl implementation)
 *
 * @param string $url URL as string
 * @return string returns the json data as string
 */
function getJsonFromUrl_curl($url) {
    $ch = curl_init();
    curl_setopt($ch, CURLOPT_URL, $url);
    curl_setopt($ch, CURLOPT_ENCODING, 'gzip');
    curl_setopt($ch, CURLOPT_RETURNTRANSFER, 1);
    $data = curl_exec($ch);
    curl_close($ch);
    return $data;
}

/**
 * Gets the json data from the given URL (zlib implementation)
 *
 * @param string $url URL as string
 * @return string returns the json data as string
 */
function getJsonFromUrl_zlib($url) {
    $context = array('http'=>array('header'=>"Accept-Encoding: gzip\r\n"));
    $url = "compress.zlib://" . $url;
    return file_get_contents($url, false, $context);
}

?>

What happens: In line 37 we do a check to see, if curl is available on the server. If yes, the function “getJsonFromUrl_curl($url)” is called, so the stackexchange API  is consumed using curl. If curl is not available, it will use “getJsonFromUrl_zlib($url)”, doing the same using zlib. This procedure requires either curl or zlib to be installed.

In the file “stackoverflow-plus.php” I implemented a check for zlib and curl on plugin activation. If neither is available, plugin activation will fail with a message to the user “Either zlib or curl needs to be installed on the server!”.

<?php
/*
Plugin Name: Stackoverflow+
Plugin URI: http://techstricks.com/wp-plugins/
Description: Stackoverflow Plus integreates your <a href="http://www.stackoverflow.com">Stackoverflow</a> profile with your word press website. Show your Stackoverflow profile, Questions, Answers, Reputation, Badges and much more through a easy to configure widget.
Version: 1.0
Author: Amyth Arora
Author URI: http://www.techstricks.com
*/

load_plugin_textdomain('wordpress-stackoverflow-plus');

if (!defined('WSP_VERSION')) {
    define('WSP_VERSION','1.0');
}
if (!defined('WSP_AUTHOR')) {
    define('WSP_AUTHOR','Amyth Arora');
}
// import the Widget Class
require_once( plugin_dir_path( __FILE__ ) . 'wsp-widget.php');

//Add the Stylesheet
add_action('wp_enqueue_scripts', 'add_wsp_style');
function add_wsp_style(){
    wp_register_style('wsp-style', plugins_url('css/stackoverflow-plus.css', __FILE__));
    wp_enqueue_style('wsp-style');
}

function stackoverflowplus_activate() {
    if (function_exists('curl_version') === false && function_exists('gzcompress') === false ) {
        echo 'Either zlib or curl needs to be installed on the server!';
        die;
    }
}
register_activation_hook( __FILE__, 'stackoverflowplus_activate' );
?>

I also turned off the accept rate from the widget settings, it doesn’t seem to be provided anymore, see this link. Please note that I only did the modifications for curl – the plugin itself was written by @mytharora.

Installing Adobe Media Server 5.0.3 on Linux with preinstalled Apache Server

I wanted to try the Adobe Media Server for streaming videos. On the development machine, Apache was already preinstalled. Adobe describes on their page, what to regard in order to install AMS (Adobe Media Server), when Apache is already installed (Use an external Apache HTTP Server for HTTP Dynamic Streaming and HTTP Live Streaming). The instructions don’t seem to be complete, here are some things I had to figure out:

The apache modules: On the page they list some windows libraries (dll) and some shared objects (so). Since I am using Ubuntu 12.04, I didn’t have any of the dlls. I ended up copying the three shared objects, in my case to:

/usr/lib/apache2/modules/mod_f4fhttp.so
/usr/lib/apache2/modules/mod_hlshttp.so
/usr/lib/apache2/modules/mod_jithttp.so

The modules are loaded through the httpd.conf file:

# Load required modules for Adobe Media Server
LoadModule f4fhttp_module /usr/lib/apache2/modules/mod_f4fhttp.so
LoadModule hlshttp_module /usr/lib/apache2/modules/mod_hlshttp.so
LoadModule jithttp_module /usr/lib/apache2/modules/mod_jithttp.so

After that, I figured out step by step what other modules I have to add in order to get it running, here’s the list:

unzipped-adobemediaserver-package/Apache2.2/modules/libadbe_dme.so
unzipped-adobemediaserver-package/Apache2.2/modules/libadbe_license.so
unzipped-adobemediaserver-package/Apache2.2/modules/libasneu.so.1
unzipped-adobemediaserver-package/Apache2.2/modules/libcrypto.so.1.0.0
unzipped-adobemediaserver-package/Apache2.2/modules/libexpat.so.1.5.2
unzipped-adobemediaserver-package/Apache2.2/modules/libhds.so

The listed modules need to be copied to the apache modules folder (in my case /usr/lib/apache2/modules). After that, apache configtest was still complaining about two missing libraries: libcares.so.2 and libexpat.so.0.

libcares.so.2 can be easily installed via sudo apt-get install libc-ares2, check pkgs.org for more information. On the fly I didn’t find a way to get libexapt.so.0 for Ubuntu 12.04, so I just copied libexpat.so.1.5.2 to libexpat.so.0 on the development machine (not recommended to do so).

After installing the libraries, I was able to start Apache, so I made the vhost configuration for the host using Adobe Media Server. The configuration can be found also on the adobe homepage. I copied the following:

<IfModule f4fhttp_module>
<Location /hds-live>
 HttpStreamingEnabled true
 HttpStreamingLiveEventPath "../applications"
 HttpStreamingContentPath "../applications"
 HttpStreamingF4MMaxAge 2
 HttpStreamingBootstrapMaxAge 2
 HttpStreamingFragMaxAge -1
 HttpStreamingDrmmetaMaxAge 3600
 Options -Indexes FollowSymLinks
</Location>
</IfModule>
<IfModule hlshttp_module>
<Location /hls-live>
 HLSHttpStreamingEnabled true
 HttpStreamingLiveEventPath "../applications"
 HttpStreamingContentPath "../applications"
 HLSMediaFileDuration 8000
 HLSSlidingWindowLength 6
 HLSAmsDirPath ".."
 HLSM3U8MaxAge 2
 HLSTSSegmentMaxAge -1
 Options -Indexes FollowSymLinks
</Location>
</IfModule>
<IfModule jithttp_module>
<Location /hds-vod>
 HttpStreamingJITPEnabled true
 HttpStreamingContentPath "../webroot/vod"
 JitAmsDirPath ".."
 Options -Indexes FollowSymLinks
</Location>
</IfModule>
<IfModule hlshttp_module>
<Location /hls-vod>
 HLSHttpStreamingEnabled true
 HLSMediaFileDuration 8000
 HttpStreamingContentPath "../webroot/vod"
 HLSAmsDirPath ".."
 Options -Indexes FollowSymLinks
</Location>
</IfModule>
After adding these, restarting Apache was not possible, apache gave me the following message:

Invalid command 'HLSAmsDirPath', perhaps misspelled or defined by a module not includedin the server configuration
Action 'configtest' failed.
The Apache error log may have more information.

I didn’t find any answers on Google, so I started to view the httpd.conf which is shipped with the package:

unzipped-adobemediaserver-package/Apache2.2/conf/httpd.conf

I found out that they use the commands “HLSFmsDirPath” instead of “HLSAmsDirPath” and “JitFmsDirPath” instead of “JitAmsDirPath”. After changing these two values apache successfully started and the video streaming over http is working.

My vhost configuration file looks like this (extracted):

<IfModule f4fhttp_module>
<Location /hds-live>
 HttpStreamingEnabled true
 HttpStreamingLiveEventPath "/opt/adobe/ams/applications"
 HttpStreamingContentPath "/opt/adobe/ams/applications"
 HttpStreamingF4MMaxAge 2
 HttpStreamingBootstrapMaxAge 2
 HttpStreamingFragMaxAge -1
 HttpStreamingDrmmetaMaxAge 3600
 Options -Indexes FollowSymLinks
</Location>
</IfModule>
<IfModule hlshttp_module>
<Location /hls-live>
 HLSHttpStreamingEnabled true
 HttpStreamingLiveEventPath "/opt/adobe/ams/applications"
 HttpStreamingContentPath "/opt/adobe/ams/applications"
 HLSMediaFileDuration 8000
 HLSSlidingWindowLength 6
 HLSFmsDirPath "/opt/adobe/ams"
 HLSM3U8MaxAge 2
 HLSTSSegmentMaxAge -1
 Options -Indexes FollowSymLinks
</Location>
<Location /hls-vod>
 HLSHttpStreamingEnabled true
 HLSMediaFileDuration 8000
 HttpStreamingContentPath "/opt/adobe/ams/webroot/vod"
 HLSFmsDirPath "/opt/adobe/ams"
 Options -Indexes FollowSymLinks
</Location>
</IfModule>

<IfModule jithttp_module>
<Location /hds-vod>
 HttpStreamingJITPEnabled true
 HttpStreamingContentPath "/opt/adobe/ams/webroot/vod"
 JitFmsDirPath "/opt/adobe/ams"
 Options -Indexes FollowSymLinks
</Location>
</IfModule>